As a SAHM (a stay at home mom) of young children and a part time teacher I often lack time to do some of the things I would like to in a day. I am a list writer – I attempt to plan out each day in a way that our home and lives will run more smoothly… but, some days I’m terrible at it! I usually finish 80% of my to do list, but sometimes I manage to finish 100%. Often that is for the simple reason that I set a low bar to begin with. 🙂 The goal is to survive and be happy. I was once told that frustration comes from unmet expectations. Managing expectations is something I am working on. So I leave things that I would just like to do off my list.
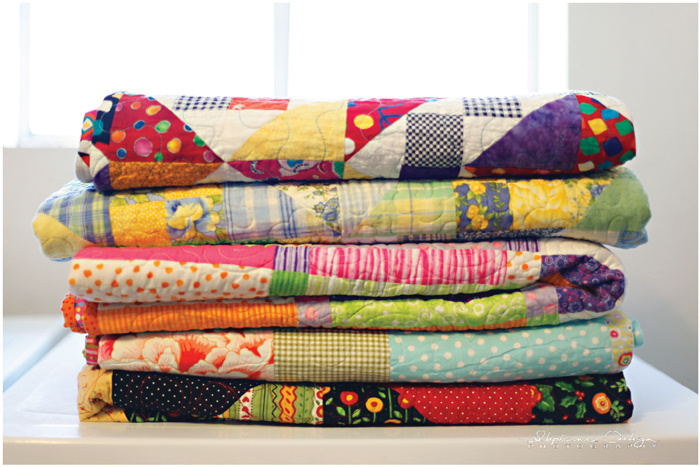
My list really helps me throughout the day. Quilting is high on my “want to do” list but it falls lower on my “need to do to survive” list. Sometimes to keep sanity I must make time for things we want to do. In an attempt to make time for my “want to do” list… which definitely means quilting… I have tried to make some of my to do list items quicker and easier.
I decided that dinner was a time user and needed streamlining. To make dinners easier I combined freezer and slow cooker meals. I made 18 frozen meals that I can just toss into the slow cooker each morning. Dinner time comes and all I have to do is open the crock pot to a warm, scrumtious dinner.
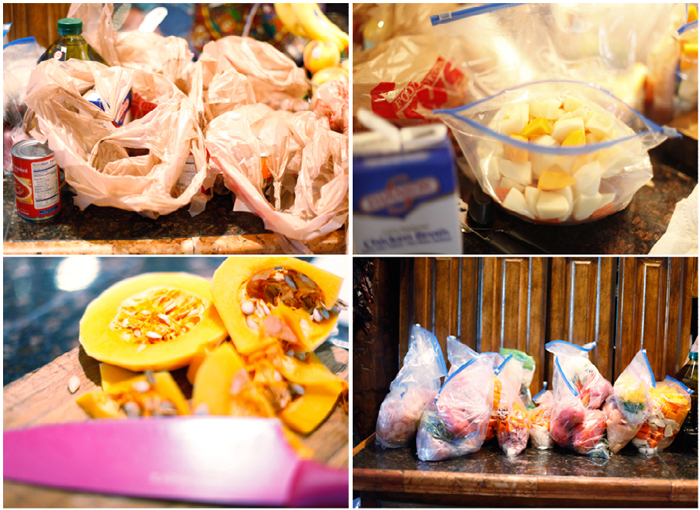 The first thing I did was to plan a few meals. I looked online for inspiration. Once I had a list of the meals I wanted to prepare, I made a list of all of the needed ingreedients. I then found a babysitter and went to the grocery store with my LONG list. I bought in bulk (saving money for me to buy more fabric.) and I brought the food home. I then went back to the grocery store for the few items I forgot, this time with kids in tow.
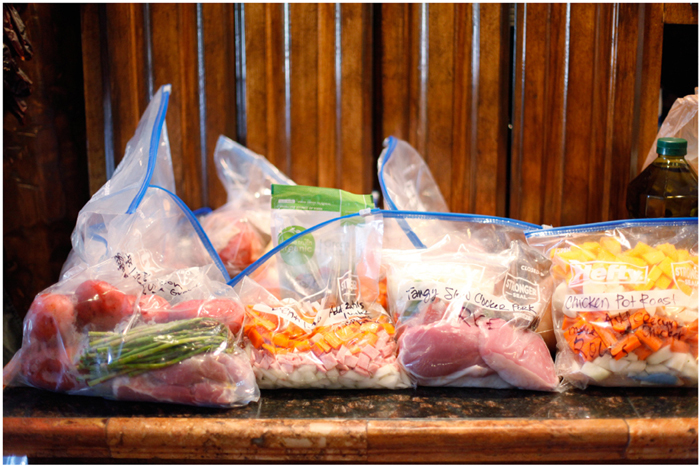
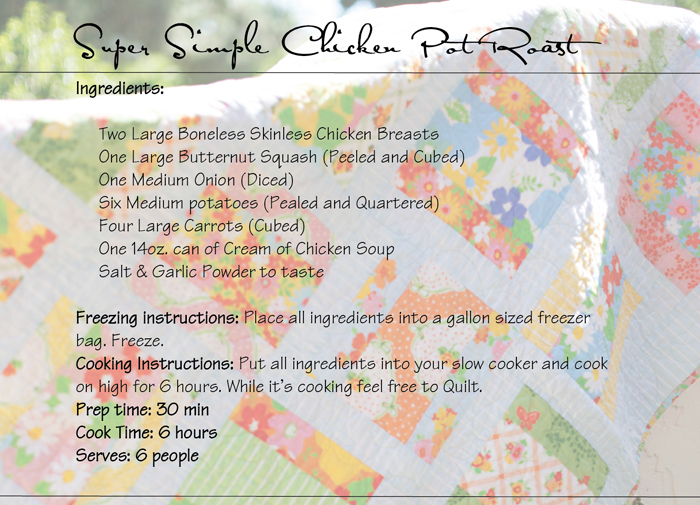
The next day my mother (who was so kind to come over and help me) and I cut up meats and vegetables and put the meals together into the freezer bags. I kept the dry seasonings in their own small freezer bags within the larger bags to add to the meal when cooking. That really just seemed like a good idea to me. 🙂 I ended up with many meals this month that are going to help me maximize my quilting time! Chicken Pot Roast, Lentil soup, Pork Chops, Sweet and Sour Pork and many more.
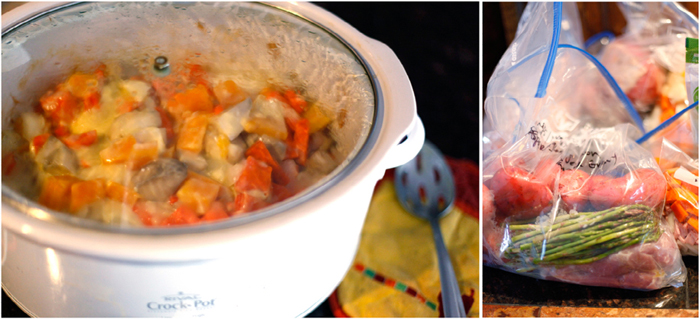
We had one of the dinners two nights ago. It was a tasty success! What types of things do you do to be more efficient and make time for quilting?
 Happy Tuesday!
Archive for the ‘Helpful Hints’ Category
Making Time to Quilt
Tuesday, October 7th, 2014To Wash or NOT to Wash…
Wednesday, September 10th, 2014That really is the question when it comes to prepping fabric for quilting. In fact there is a lot to think about when laundering or not in preparation for quilting and after completing a quilt.
I remember when I was young my mother would get the fabric all together for a quilt and she’d put it in the wash. This new perfectly flat fabric would be washed and dried. Then she would spent what seemed to me to be days ironing the newly cleaned fabric all before starting a quilt. Wow! What a hassle. So when not washing fabric came into vogue I was quick to jump on the band wagon. But really there are times when washing could be better and times when not washing could be the better choice.
There are a few hard fast rules like never wash precuts. (If you wash a stack of precuts you’ll be sad because what at you remove from the dryer will be an unusable pile of threads. Just trust me. Less crying that way.) And wash a quilt if it gets dirty. An un-washable quilt is not very practical or useful.
Wash or don’t wash before quilting? Here are a few things to think about. The choice will have different effects on the look of your quilt after machine quilting. If you wash the fabric before cutting and quilting your quilt will be smoother. If not you will get a more “quilty” look where the quilt top will shrink a little more.(That makes it a little more bunchy at each stitch.)
When planning a quilt think about how often you plan on washing the quilt. This may effect the type of applique and binding you select for your quilt. If it’s a quilt for picnicking or for a child or any quilt that may be washed more often you may want to opt for machine binding and applique. Heavy washing can tear at the threads and machine stitches are normally stronger and closer together. If it is a less washed quilt, hand binding and hand applique would be great.
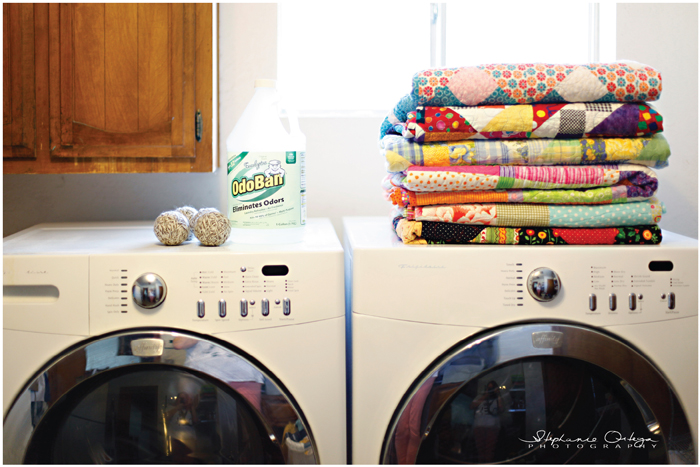
If you are giving your quilt away you may want to do what my mom does. It’s BRILLIANT! She makes her quilts smell wonderful for the lucky recipient by adding scented liquids to the load. She always adds Odoban, but there are an hundred things you could add. One could add rose water, detergents, Odoban, or essential oils into the bleach tray. (For oils I think linen, citrus, peppermint and vanilla would all be yummy!) 
Hope these little, laundering tips are helpful! Happy Tuesday!
InStyle Inspiration
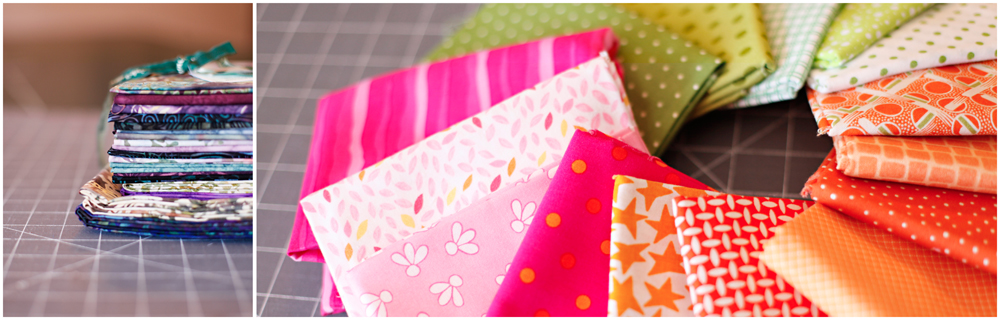
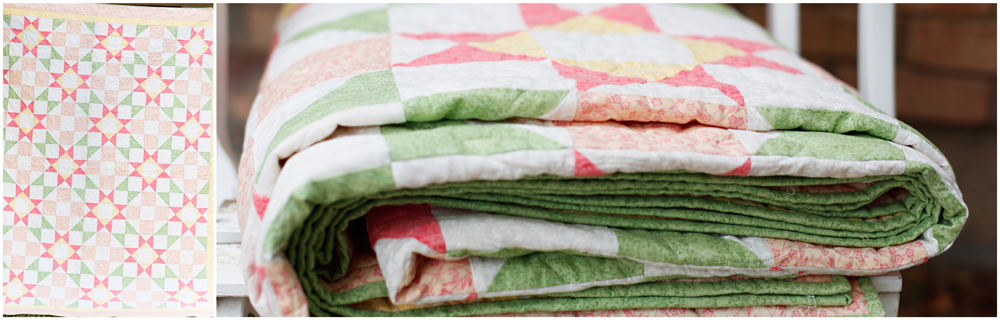
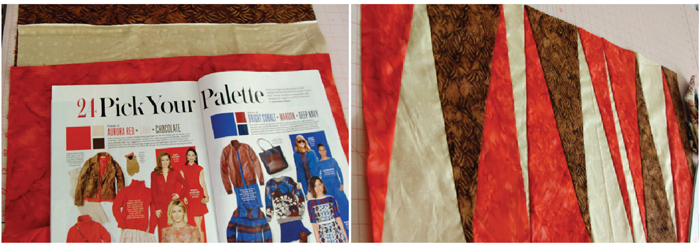
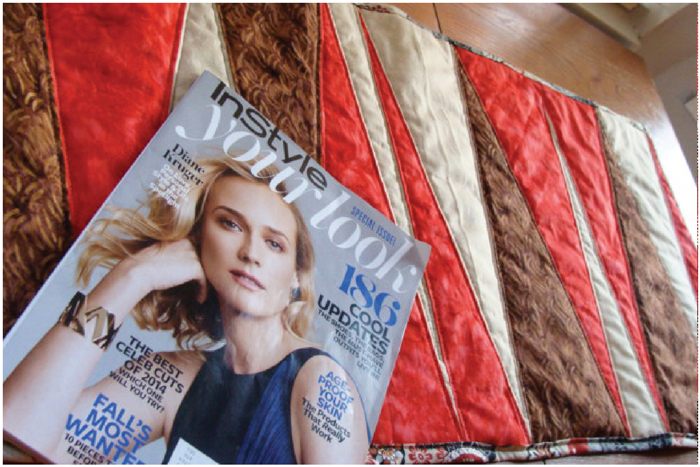
Sunday, September 7th, 2014I’ve been a subscriber to InStyle Magazine since 2011. What started as a well thought Christmas present became a friendship. InStyle and I get along really well. It influences my style and this week it has influenced my quilting. One of the recent issues was the Fall Special Issue “Your Look” and it describes 30 ways to update your look. #24 was “Pick Your Palette” which gave some examples of great color palettes. The palettes are unique combinations of colors and for quilting are a great place to start. I chose one of the palettes and made a table runner to show how easy it is to go from runway to quilt-way! The palette included Aurora Red, Sand, and Chocolate.
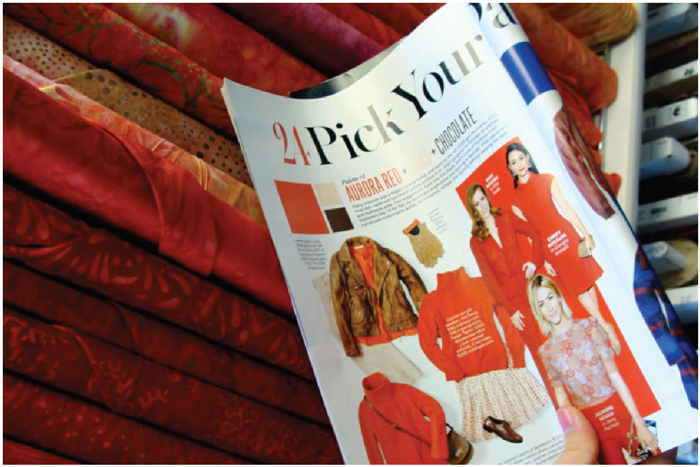
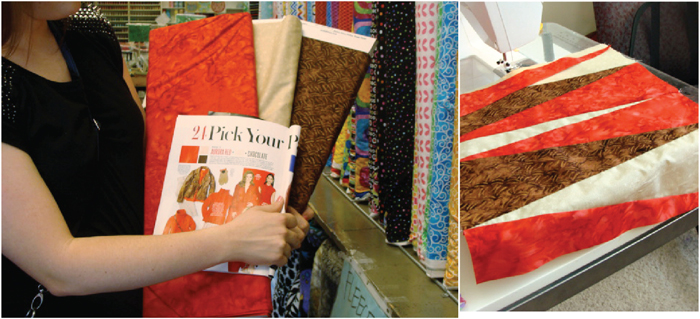
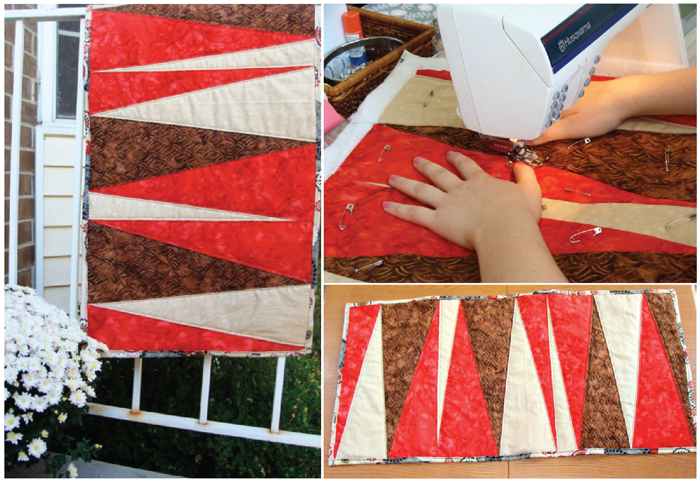
I did an easy modern design to showcase the palette. My mother came up with the design and an easy way to make it. We stacked the 3 different fabrics (each 1/2 yard), one on top of the other, and cut across making different triangles. Then we rearranged the colors, sewed the pieces back together, and ta-da, table runner!!! I really love the way these colors go together and I got the idea from a fashion magazine!
Things to think about when going from runway to quilt-way:
1. Fashion colors might not have enough contrast for your quilting squares. My runner had a bright, a dark, and a neutral color. This is a good way to start.
2. Sometimes fashion can be extreme and over the top, so just use little bits of inspiration. Example: Feathers covering entire outfits= some feather printed fabric.
3. Look for fashion trends that can be translated to home decor because quilts usually add to the home look. An example of this is the mighty chevron stripe! Looks good on a skirt and a bed spread.
Fashion can be a means of inspiration for a quilter. Trends this fall include neutral plaids, winter pastels, animal print (especially snakeskin), and mixing bold and bright colors with subdued tones (easy to translate to quilting). So be bold in your quilting and seek for inspiration outside the quilt shop.

Laying Out Your Quilt
Sunday, August 31st, 2014
What to do, what to do . . . Sometimes figuring how to lay out your quilt blocks once they’re made is the hardest part of making the quilt. I find that after I have spent all the time cutting and sewing the blocks, I’m not sure if I want the quilt to look like the original design I’ve been working on for the last several days! That’s what design walls are for, you say? Well, I have a design floor. Somehow I’ve never gotten a design wall up anywhere, mostly because I have things hanging on every available wall in my house . Here are four different ways of laying out this quilt. Post your comments on which layout you like, and later I’ll let you know which one I chose.
A.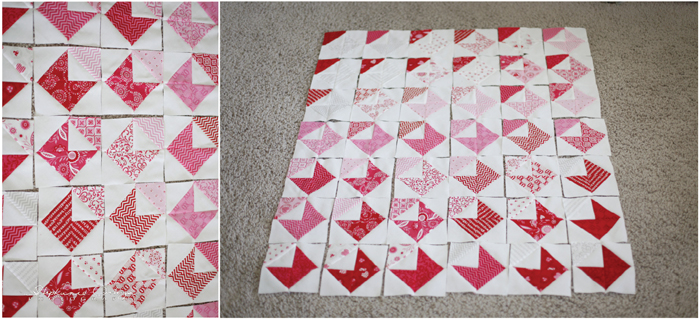
This is the original layout for my quilt. I saw The Love Note Quilt first on the Missouri Star Quilt Company’s YouTube channel, and I fell in love with it. So did my daughter, Stephanie! So now it’s going to be her daughter, Hope’s, baby quilt. As you can see, I laid the quilt pattern out in a gradient from light grey to dark red. I’ve spent a little time getting it all put together. I really enjoyed making the quilt squares, and now it’s time to sew the rows together, but do I really want it to look this way?
B.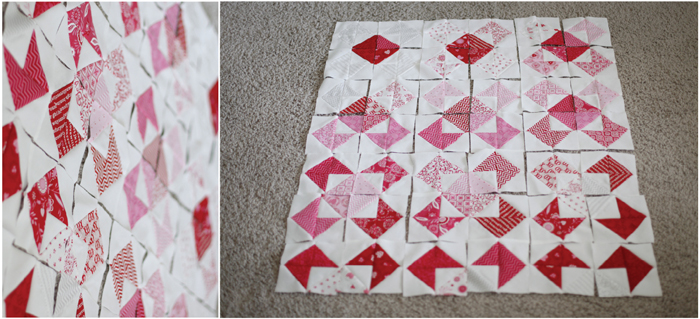
The patterns above and below are variations of the second pattern I tried. In the layout above (B.) I kept the squares in the same order, simply turning them to create the X patterns. By simply turning the blocks, I kept my original idea of a gradient from light grey to dark red. However, I don’t think it’s as apparent in this layout as it is in the first layout.
C.
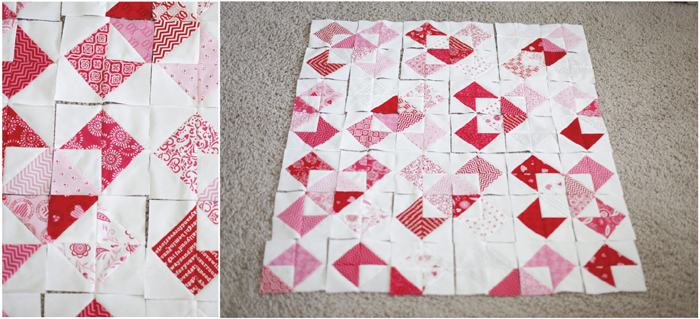
In this layout (C.), I placed the blocks randomly but in the same layout as (B.), giving the quilt a more scrappy look. With the more scrappy placement of the blocks, some of the X pattern seems to disappear depending on which colors happen to be next to one another.
D.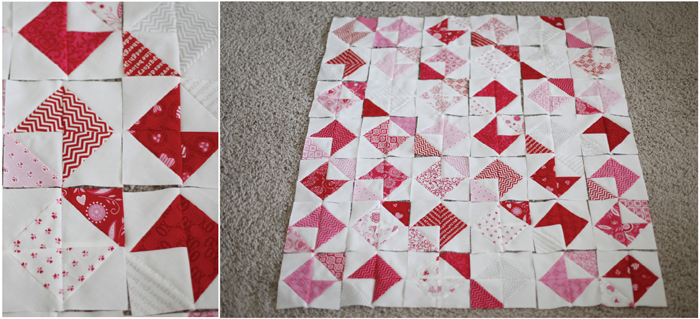
Here’s a look at the last layout I did for this quilt. The layout above was done with the blocks still scrappy (D). It’s funny, but it wasn’t until after these were all laid out that I realized that they were in rows with each envelope block turned the opposite way. You can see it if you look hard, but the actual appearance seems to be diagonal rows of envelope blocks. I really like this one. I like the way the alternating blocks create a white envelope made from the four blocks coming together. One of the fun things about changing the layout is the secondary designs that appears when you put the blocks together.
This last layout (E.) is the same as the one above (D.) with the blocks back in a gradient from light gray to dark red~I like this one, too! There are so many ways to lay out the blocks you’ve made for your quilt. Just have fun designing your quilt. Nothing is written in stone, so make it the way you want it to look. Which one do you like the best?


