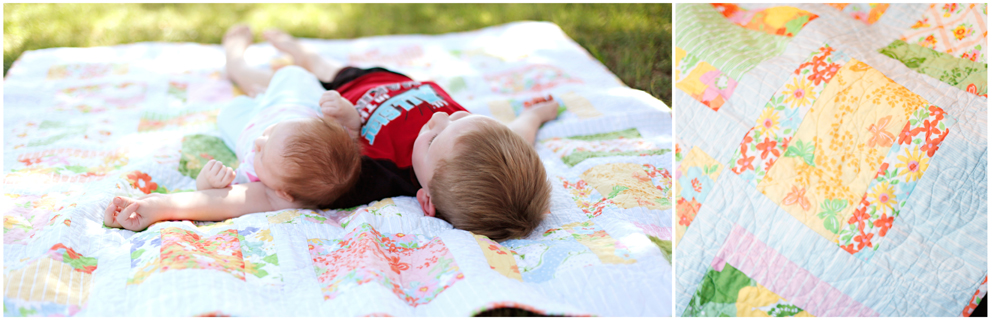
 I made this quilt seven years ago. At that time I had no children, but I was really wanting them! These ducklings were kind-of my hope for the future family. You know… kind of an “If you build it they will come” strategy. SO now I have two cute kids who do follow me everywhere (sometimes too much). I pulled this quilt out and realized it has still never been washed. It just sits in my cedar chest waiting to be used.
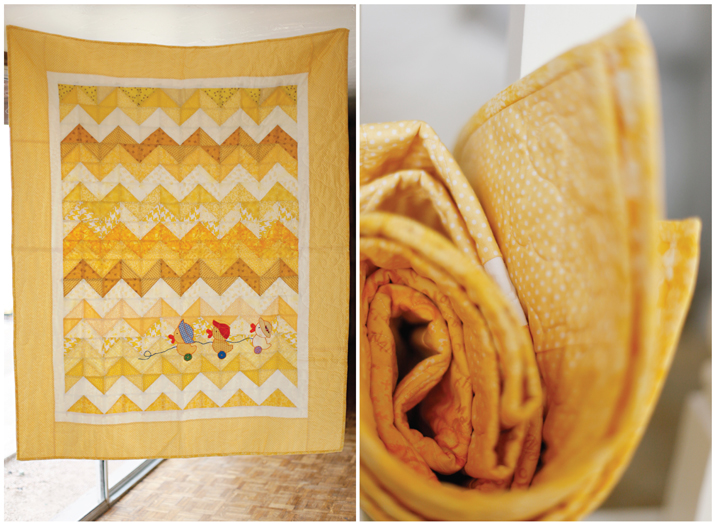
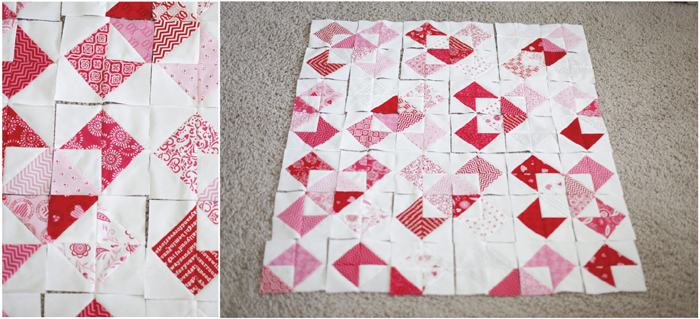
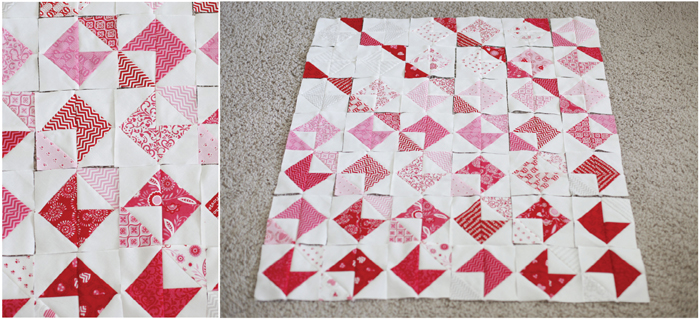
I have always LOVED the color yellow and so one day I decided I wanted to make a yellow and white quilt. At the time I had not seen chevrons done on a quilt and so my design of half square triangles creating chevrons was, I thought, ingenious. 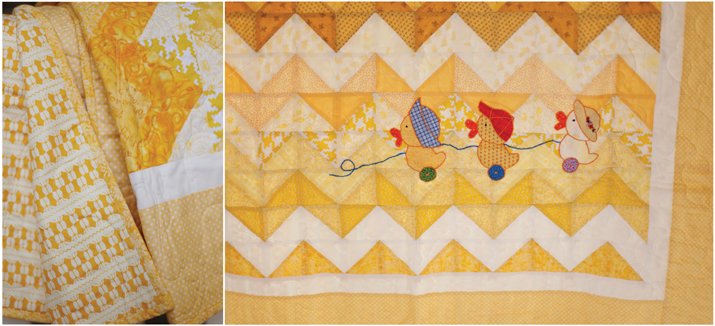 My mother had traced a duck 25 years ago out of a coloring book. I used that as my inspiration for the applique. It was my first time doing applique and I learned a whole lot! I wanted them all to be fun and unique and I wanted more boys than girls. 🙂
Maybe the next child will get it. Happy Wednesday! 
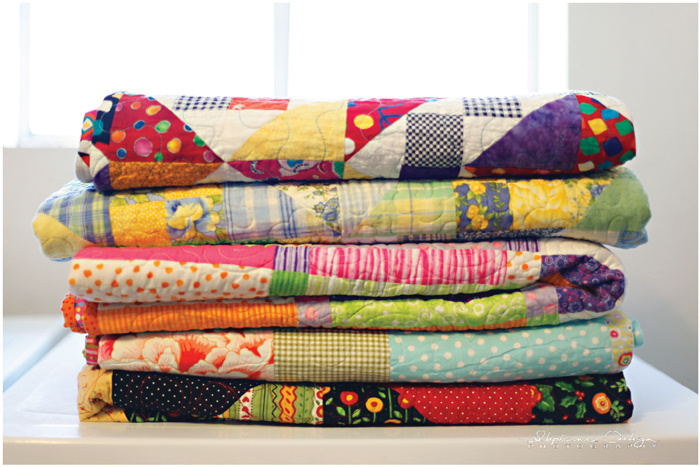
Archive for the ‘Quilting’ Category
3 Little Ducks – Quilt
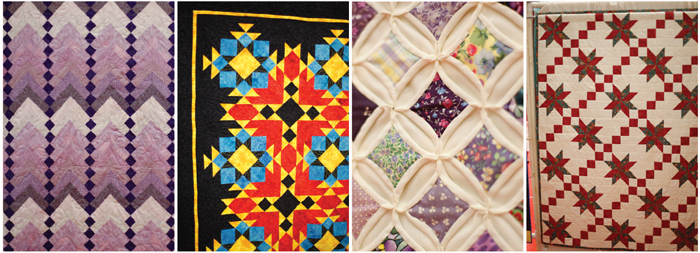
Wednesday, June 10th, 2015HAPPY NATIONAL QUILT DAY!!!!
Saturday, March 21st, 2015 Yay for quilting! It is wonderfully addicting, magically calming and creative. We love it! 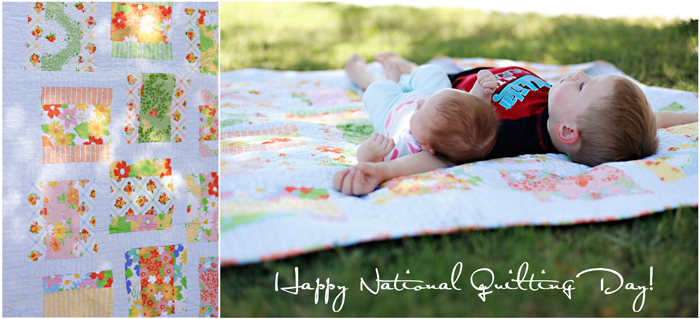
Charming Chavo
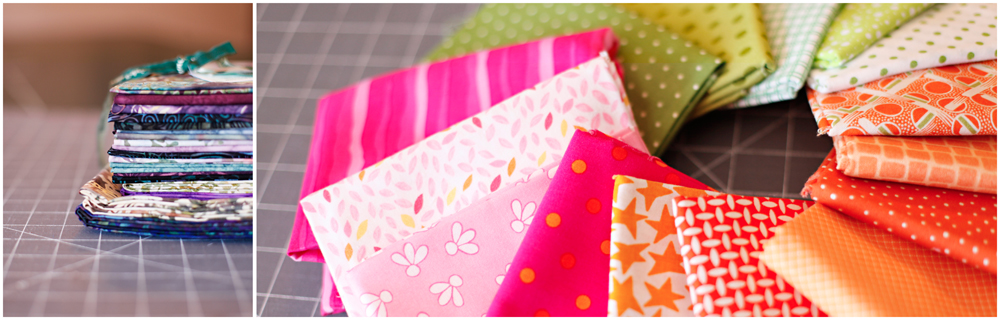
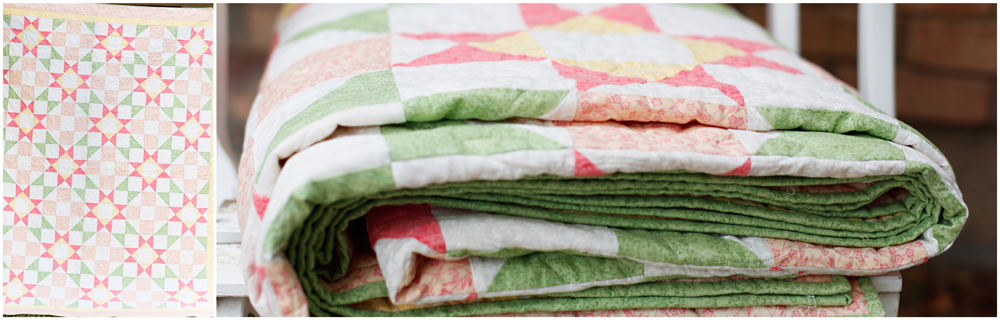
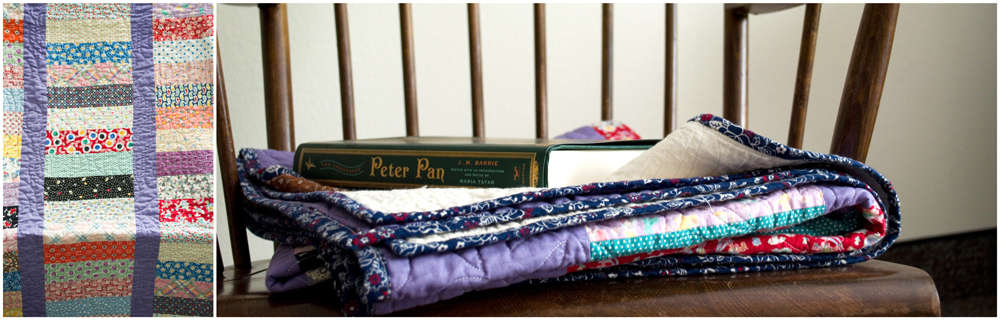
Friday, February 27th, 2015I can’t believe it is already the end of February 2015! Happy Christmas, Merry Thanksgiving, Happy New Year and Happy Birthday to four of the gals here at Triangles Gone Mad! (Jaime, Hilaree, Jessica and Me (Stephanie)… TIME FLIES!!! We have gone a long time with no blogging and I have gone a long time with even no quilting… Instead there were holidays, birthdays, a funeral, buying a new house, moving, and normal every day life happenings. And now here I am getting back on the horse.  I always wanted to make a charm quilt (a charm quilt is a quilt where each fabric is different and never repeated). I liked the idea of using hundreds of different fabrics to create something truly unique and never replicable. Because of the sashing and borders this is not a true charm quilt but it was inspired by them. I named this quilt “Charming Chavo” because it’s colorful and festive.
 This quilt was a long time coming! I spent YEARS collecting the fabric and MONTHS cutting each piece, WEEKS sewing it together and mere DAYS to quilt and bind it. The closer I got to finishing this charm quilt, the faster and more diligently I wanted to work on it. The pieces came from old fabrics my mother used for our clothing as children, fabrics we had quilts made out of and scraps from my own quilting. I was somewhat un-scrutinizing in the way I selected the different fabrics. If it was colorful or interesting, I would cut a piece and add it to the pile. I just wanted enough to make the quilt. 🙂
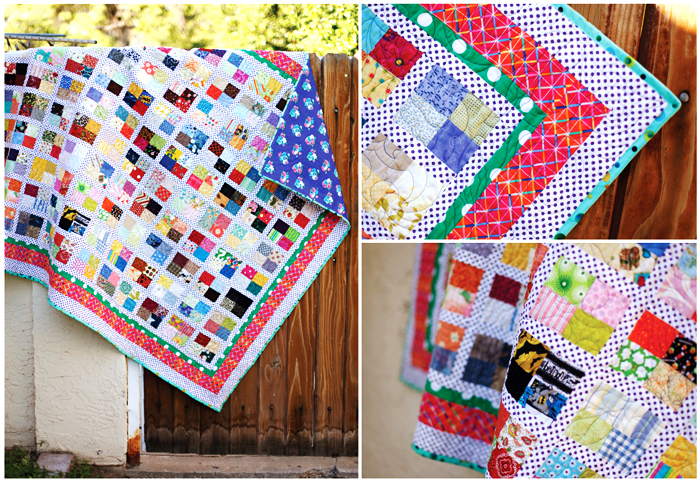 Choosing the sashing was a bit of a conundrum for me. I thought since it was such a big part of the quilt that I had to get it right! I imagined it originally with plain white sashing. However, after laying some of the completed blocks onto the sashing material, I realized that it was boring and too predictable, so I found a fabric that I felt gave the quilt my desired vibe. I was hesitant because sometimes a small print on a large area can get crazy, but I think on this one it was a win!
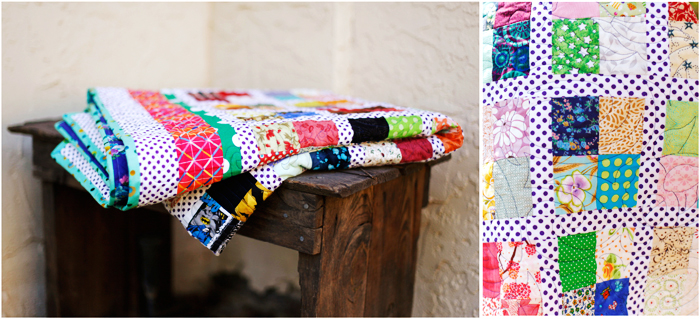 The quilt deets:
485 different fabrics used in this quilt
120 rectangles (each made of 4 fabrics)
1″ finished sashing between each rectangle
Finished quilt measures 60″ X 78″
One accidental repeat of fabric… oops!
Happy Saturday!
Grandpa’s Quilt of Valor
Tuesday, November 11th, 2014The mission of the Quilt of Valor Foundation is ” to cover service members and veterans touched by war with comforting and healing Quilts of Valor.” To date the QOV Foundation has awarded over 108,000 quilts to veterans of American wars. I have been quilting for QOV for about two years, and it is so very rewarding to do some small thing for our service men and women who give so much for our safety and freedom. To learn more about QOV go to their website here.
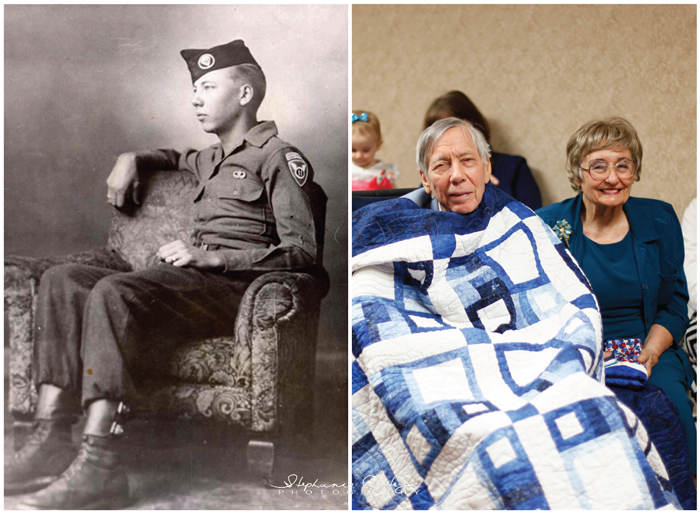
Last month I was privileged to award a Quilt of Valor to my father-in-law, Gene Wade, who served in the Army’s 11th Airborne Division as a paratrooper. He was stationed in Japan at the end of WWII. At the time we gave him the quilt he had just had a stroke, and was in a skilled nursing facility at the time. They were gracious enough to let us use one of the public rooms for the ceremony.
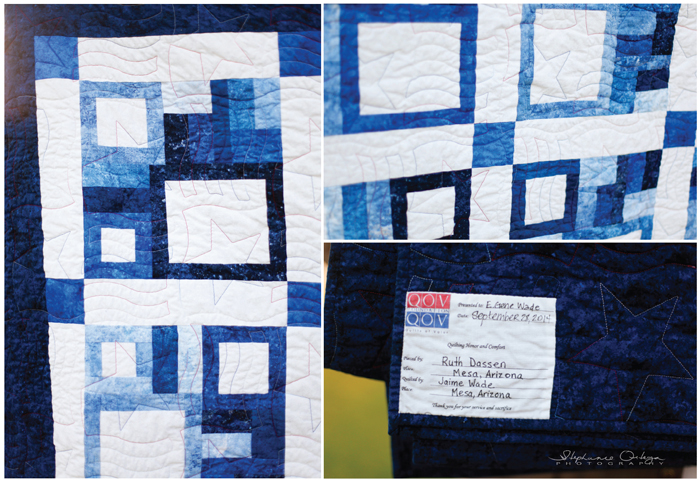
The quilt we gave him was one that I had done the longarm quilting on. The quilt top was made by Ruth Dassen, who is a tireless worker when it comes to making Quilts of Valor here in Arizona. The quilt was beautifully sewn and the quilting added the final touch.
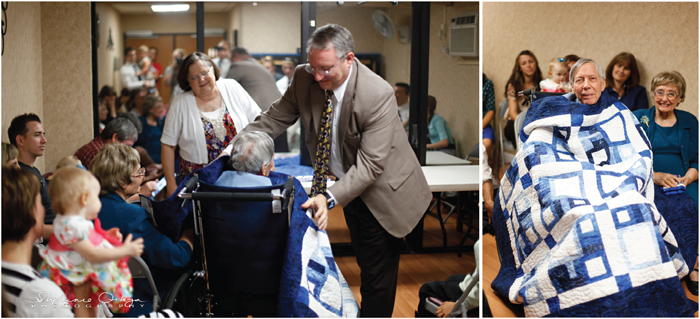
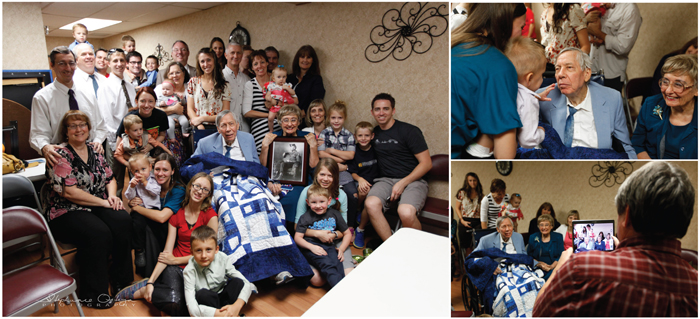
Here is my husband, David, wrapping Gene up in all the warmth and appreciation that is stitched into every Quilt of Valor. Gene and Joy were happy to receive the quilt and appreciation that came along with it. All the family members wanted to share in the excitement of the day, especially the great-grandchildren! Thank you, Gene, for your service to our country!
To Wash or NOT to Wash…
Wednesday, September 10th, 2014That really is the question when it comes to prepping fabric for quilting. In fact there is a lot to think about when laundering or not in preparation for quilting and after completing a quilt.
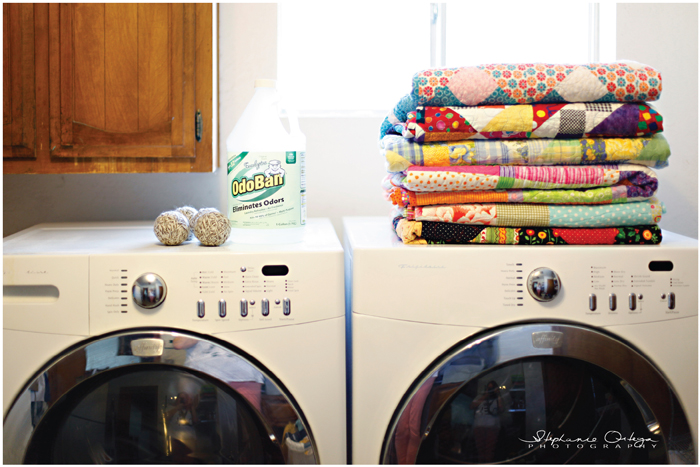
I remember when I was young my mother would get the fabric all together for a quilt and she’d put it in the wash. This new perfectly flat fabric would be washed and dried. Then she would spent what seemed to me to be days ironing the newly cleaned fabric all before starting a quilt. Wow! What a hassle. So when not washing fabric came into vogue I was quick to jump on the band wagon. But really there are times when washing could be better and times when not washing could be the better choice.
There are a few hard fast rules like never wash precuts. (If you wash a stack of precuts you’ll be sad because what at you remove from the dryer will be an unusable pile of threads. Just trust me. Less crying that way.) And wash a quilt if it gets dirty. An un-washable quilt is not very practical or useful.
Wash or don’t wash before quilting? Here are a few things to think about. The choice will have different effects on the look of your quilt after machine quilting. If you wash the fabric before cutting and quilting your quilt will be smoother. If not you will get a more “quilty” look where the quilt top will shrink a little more.(That makes it a little more bunchy at each stitch.)
When planning a quilt think about how often you plan on washing the quilt. This may effect the type of applique and binding you select for your quilt. If it’s a quilt for picnicking or for a child or any quilt that may be washed more often you may want to opt for machine binding and applique. Heavy washing can tear at the threads and machine stitches are normally stronger and closer together. If it is a less washed quilt, hand binding and hand applique would be great.
If you are giving your quilt away you may want to do what my mom does. It’s BRILLIANT! She makes her quilts smell wonderful for the lucky recipient by adding scented liquids to the load. She always adds Odoban, but there are an hundred things you could add. One could add rose water, detergents, Odoban, or essential oils into the bleach tray. (For oils I think linen, citrus, peppermint and vanilla would all be yummy!) 
Hope these little, laundering tips are helpful! Happy Tuesday!
Quilt Show & Love Lessons
Wednesday, September 3rd, 2014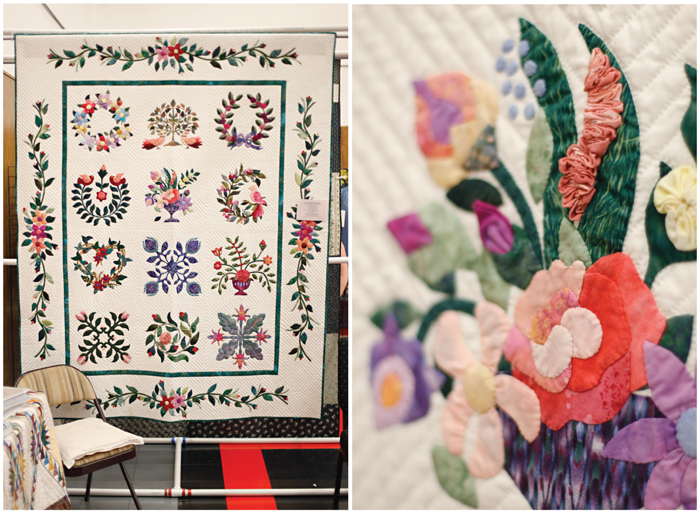
Labor day weekend is always a fun time for our family. Our anniversary usually falls in that weekend and so we celebrate our “family’s birthday” together. This year we were fortunate to get to go up north to cooler weather. While we were up there we had lots of fun without the Internet and it’s accompanying worries. One morning while driving to a couple of places Harley and I saw a sign that said “Quilt Show; Labor Day Weekend”. How is it that there happened to be a quilt show just down the road from where we were staying on the one weekend in a year that I would be there? A coincidence? A blessing? Maybe both? Well whatever it was I was more than happy when I saw the sign.
It is an interesting thing to be married because your spouse sometimes has very different likes and dislikes and there are moments when we have no desire to do things but we do them because we love our spouse. This quilt show was one of those times. I know that Israel is sometimes frustrated with my hobby and the amount of time and effort that sometimes goes into it. And I talk incessantly about stitches, fabric choice, patterns, etc. All of this renders him bored out of his mind, but he listens and tries to be engaged and when all else fails he feigns interest. I love him for that. So when I told Israel about the quilt show he, the best husband EVER, knowing that he would be bored and most likely just act as babysitter, said we should all go. And so we did.
Marriages are like quilts and the same way that the contrasting, similar and complimentary fabrics play together to create beautiful patterns and art so does the contrasting, similar and complimentary personalities and likes and the conscious and planned way that we put them together can create a beautiful marriage. Cheesy I know. But true.
It was a fun little quilt show. There are SO many talented quilters all over. I took photos of some of my favorite quilts and exhibits. There were some of the local guild members encouraging membership and a few other local organizations with booths and raffles. We walked around and looked at the pretty quilts and spoke to some of the designers/quilters about techniques and other things. Some of them would stop me just so they could get a look at my pretty baby girl. She was a treat. Even though she was teething she still gave out smiles to all the nice people. 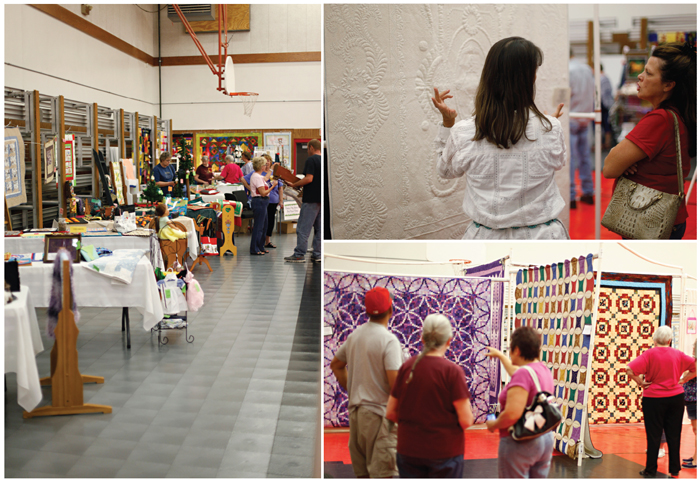
The whole quilt show was super fun for me! My husband is SO kind. He took Harley around and they found stuff that was fun for him and then they went and played at the playground outside the school where the show took place. What a fun quilt show, we enjoyed it so much. I have such a fun family! Happy Wednesday!
Laying Out Your Quilt
Sunday, August 31st, 2014
What to do, what to do . . . Sometimes figuring how to lay out your quilt blocks once they’re made is the hardest part of making the quilt. I find that after I have spent all the time cutting and sewing the blocks, I’m not sure if I want the quilt to look like the original design I’ve been working on for the last several days! That’s what design walls are for, you say? Well, I have a design floor. Somehow I’ve never gotten a design wall up anywhere, mostly because I have things hanging on every available wall in my house . Here are four different ways of laying out this quilt. Post your comments on which layout you like, and later I’ll let you know which one I chose.
A.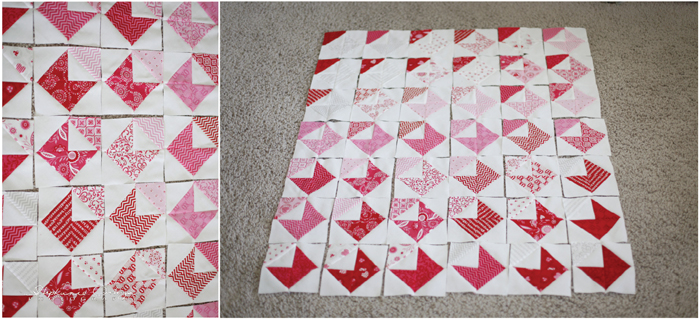
This is the original layout for my quilt. I saw The Love Note Quilt first on the Missouri Star Quilt Company’s YouTube channel, and I fell in love with it. So did my daughter, Stephanie! So now it’s going to be her daughter, Hope’s, baby quilt. As you can see, I laid the quilt pattern out in a gradient from light grey to dark red. I’ve spent a little time getting it all put together. I really enjoyed making the quilt squares, and now it’s time to sew the rows together, but do I really want it to look this way?
B.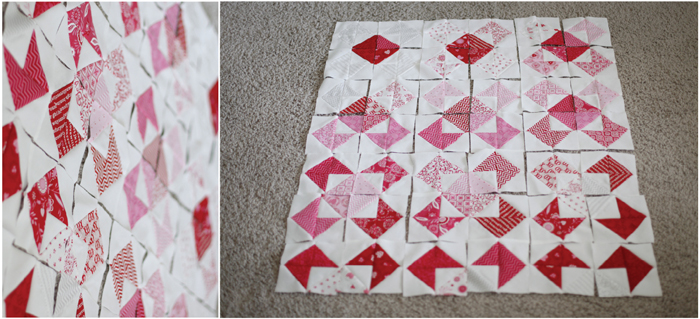
The patterns above and below are variations of the second pattern I tried. In the layout above (B.) I kept the squares in the same order, simply turning them to create the X patterns. By simply turning the blocks, I kept my original idea of a gradient from light grey to dark red. However, I don’t think it’s as apparent in this layout as it is in the first layout.
C.
In this layout (C.), I placed the blocks randomly but in the same layout as (B.), giving the quilt a more scrappy look. With the more scrappy placement of the blocks, some of the X pattern seems to disappear depending on which colors happen to be next to one another.
D.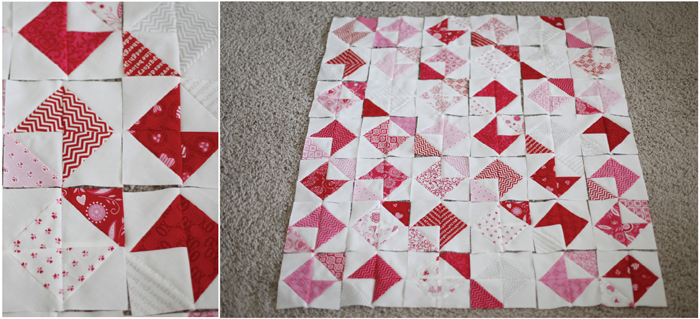
Here’s a look at the last layout I did for this quilt. The layout above was done with the blocks still scrappy (D). It’s funny, but it wasn’t until after these were all laid out that I realized that they were in rows with each envelope block turned the opposite way. You can see it if you look hard, but the actual appearance seems to be diagonal rows of envelope blocks. I really like this one. I like the way the alternating blocks create a white envelope made from the four blocks coming together. One of the fun things about changing the layout is the secondary designs that appears when you put the blocks together.
This last layout (E.) is the same as the one above (D.) with the blocks back in a gradient from light gray to dark red~I like this one, too! There are so many ways to lay out the blocks you’ve made for your quilt. Just have fun designing your quilt. Nothing is written in stone, so make it the way you want it to look. Which one do you like the best?

Passionate Paisley
Monday, August 25th, 2014Shall we make a pattern? Many quilters either pick a pattern and get the fabric to make it, or have fabric and then pick a pattern that matches the amount of fabric they have. So, I’m the quilter who just wants to make up my quilt based on the fabric I have. When I pick fabrics, I start to design a pattern in my mind. I have a hard time sticking with a pattern from a quilting book. Of the four quilts I’ve made, I designed three and modified the other. With my paisley quilt, I didn’t even try to find a pattern that would work. I’ve realized that, when it comes to quilting, I just need to design my own quilts and do my own thing. After a few quilts, I decided to try a more complex pattern, but not one too crazy.
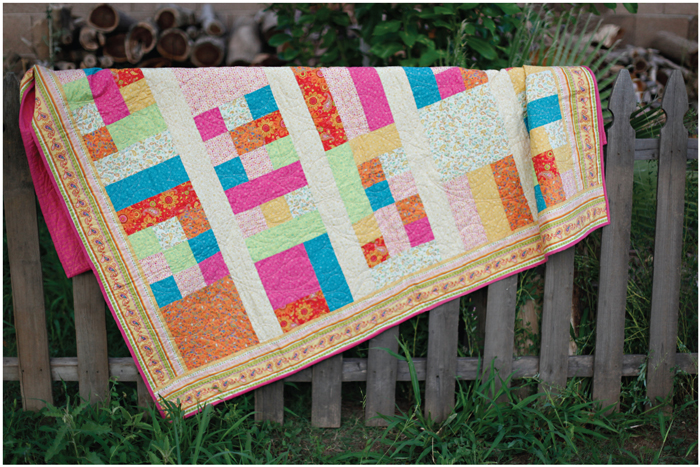
For Passionate Paisley, I decided I wanted to showcase the fabric, so I chose to do squares. One thing you have to decide is whether you want your fabric to be the focus of your quilt, or if it’s all about the pattern.
While making my quilt blocks, especially the nine-patch squares, I had to keep seam allowance in mind. This means a quarter inch is taken off each edge for the seam on every piece of fabric. That was the most difficult part of the design process because of the math.
I learned when making my featured quilt, Passionate Paisley, sometimes you just have to make do with what you have. Don’t let it frustrate you into quitting, be flexible. The fabric for my backing wasn’t quite long enough, so I added a strip of another fabric to make it big enough. Now it’s one of my favorite parts of the quilt. Making your own design is satisfying, you should try it!
Quilt facts:
The binding is corduroy, which adds just a little fun.
There are thirteen different fabrics in the quilt.
It’s made up of more than five unique blocks.

Blankets from Clothing
Wednesday, August 13th, 2014I have made many quilts out of clothing in my quilting “career” and throughout that I have learned a thing or two about quilting with clothing. Here are a few thoughts and photos for all to see.
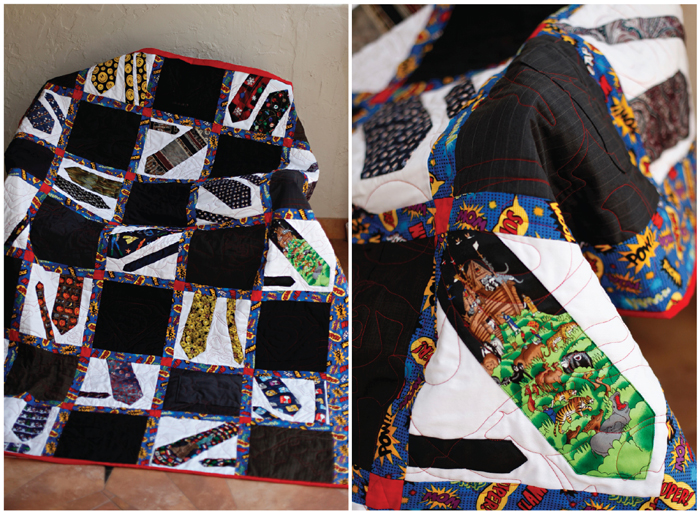
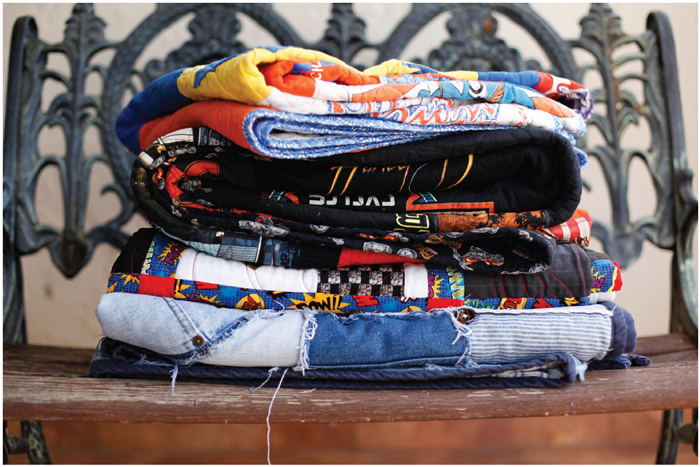 Last year my dad retired from teaching religion for 20 years. Throughout his teaching career he wore a suit, white shirt, and tie 6 days each week. These were often cheesy cartoon and holiday ties. I’m pretty sure his students loved the ties. They really go with his humor in the classroom. When he retired we (Mostly me) decided that it was time for him to also retire some of his ties. Suits wear out pretty easily when you wear them so often, so we had to get rid of those too. He has always worked so hard to support our family of nine and I decided as a retirement gift I would make him a quilt. I had made t-shirt quilts before but my dad wasn’t a t-shirt wearer. This tie, suit and white shirt quilt was as a t-shirt quilt for MY dad. He’s like a real life super hero hence the superhero backing and sashing. It was a fun quilt to design and create. A thought on this quilt is that quilts can be personal.
#1. They can be very special and sentimental.I don’t know about you but I really like and have strong feelings for some of my clothing. I’m a person who will wear a favorite t-shirt until it is too hole ridden and thin to pass as clothing. Those soft worn clothes can be the perfect fabric for a cuddly quilt. Using them in a way that makes them “last” makes me happy. 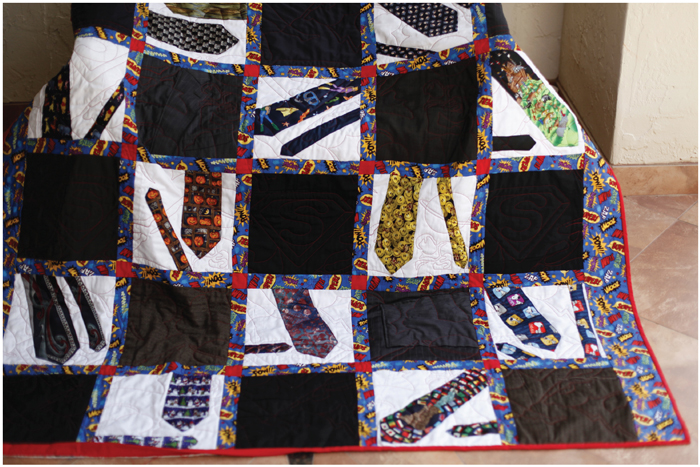
All other clothing quilts I have made also hold sentiment and they have taught me a thing or two. Such as…
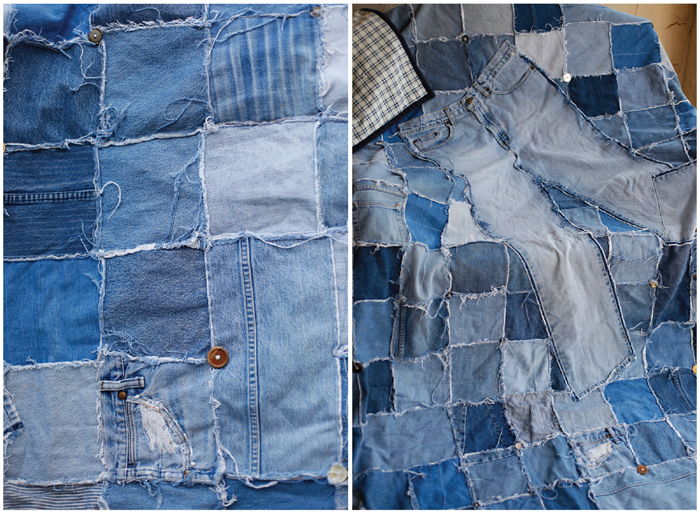
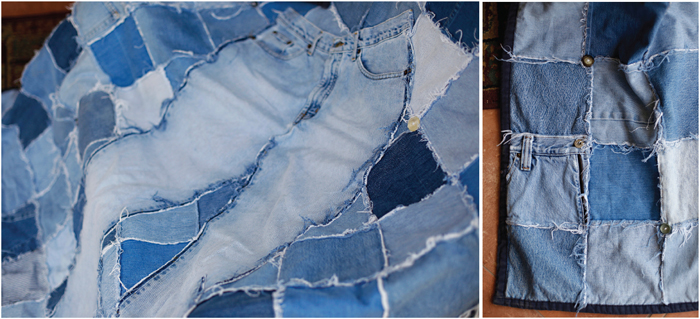
#2. Not all machines are made to handle jeans or many layers. Both the jean quilt and the suit quilt had parts that were very thick or many layers. Make sure you invest in the right needles and that your machine is made to handle such tough fabric and or multiple layers of fabric. The jean quilt was not machine quilted because I chose to display many pockets and zippers and buttons. These don’t do well on a long arm machine with out outlining and “cutting” around each thing. And even then you have to be careful about when the arm is traveling that it doesn’t catch or run into the objects. The suit quilt was long arm quilted and I should have been more diligent in getting rid of the interfacing on the ties and some suit pieces… Next time!
My mother saved our jeans my whole life… or at least as long as I can remember. We all wore hand me downs and when a pair was unwearable any more (they didn’t fit, they got a bleach spot or a hole, or they just got old) it went into a bag up in the attic. I was so grateful for this stash one day when I decided I wanted to make and then subsequently designed a jean quilt. I then climbed up into the attic and pulled out two large trash sized bags of jeans. I cut and sewed and quickly made that quilt. At the age of 16 I would never had saved enough of a variety of jeans on my own to make a quilt. Thanks Mom.
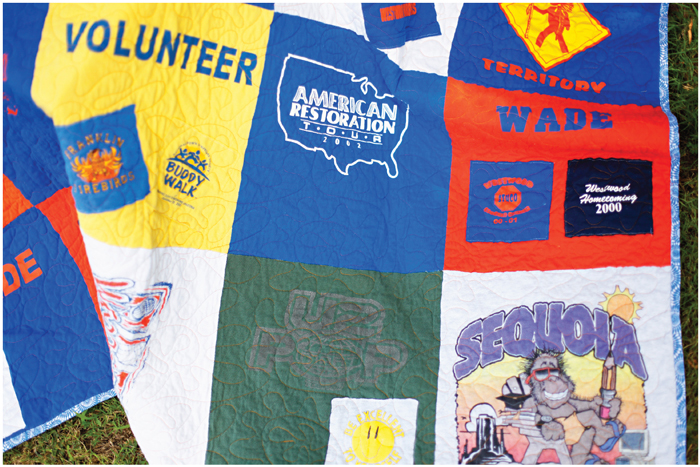
So I live in Mesa, AZ which may be the only city on earth that cares what high school you attended even into your eighties. There is a lot of school pride in this city and beyond that I am one of seven kids, our parents graduated from the same high school, six of us seven siblings graduated from the same high school and my husband also graduated from that same high school. I was very active in sports and extracurriculars and so I had LOTS of t-shirts… what else to do but make a quilt. From this quilt I learned…
#3. don’t stretch or pull the pieces. Clothing fabric and T-shirt are fun and easy to work with as long as you are careful. clothing fabric is different to your typical coating quilting fabric because it often has more stretch to it. When stretched these fabrics change shape and curl on the edges. Not good. So you have to be careful not to pull of fold these fabrics too much. T-shirt is fun because it sticks to itself. Because of this, when working with it the pieces can just be laid on top of each other without pinning. And when I can avoid pinning I do. Then just allow the sewing machine to feed the fabric through itself holding softly.
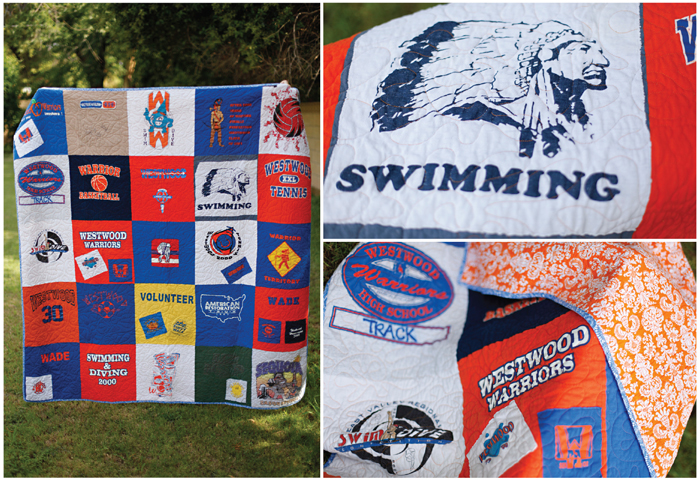
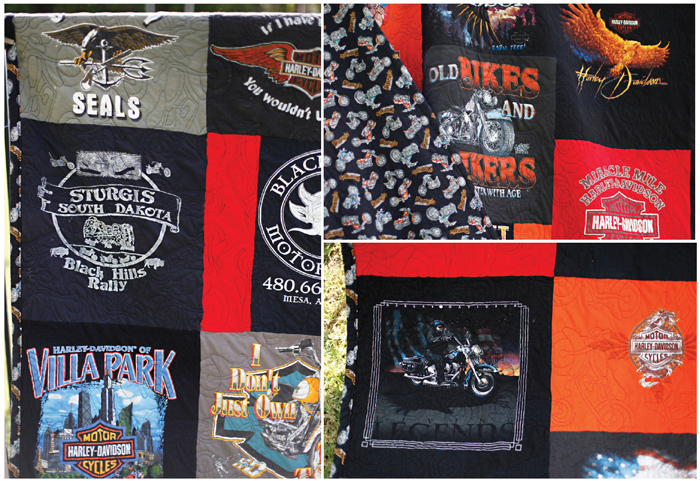
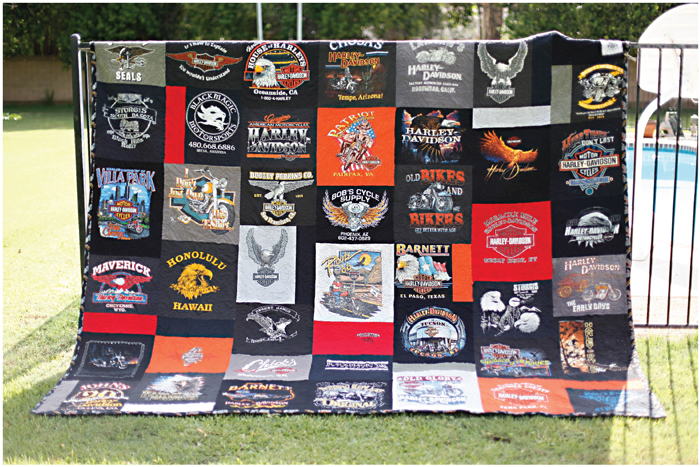
#4. There are endless possibilities. No one is going to have the exact same clothing to put into a quilt and so there are no two alike. When you decide the clothing you would like to use there are SO many designs that you can create. I made another t-shirt quilt and it is very different from my high school t-shirt quilt. This one (below) is made of Harley Davidson Motorcycle T-shirts that my father-in-law had accumulated over years. It is backed with fabric that I ordered from Sturgis, South Dakota. My father-in-law and my husband and his brother attended The Sturgis Rally together years ago. And to make it even more motorcycle themed, I quilted it with a motorcycles stitch. I love how it turned out.
There are SO many fun ways to quilt with clothing! Get designing and you could make your clothing into something great! Happy Wednesday!
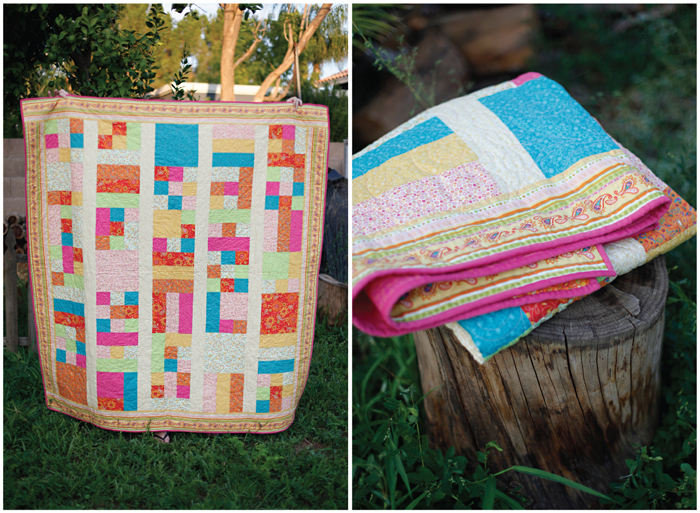
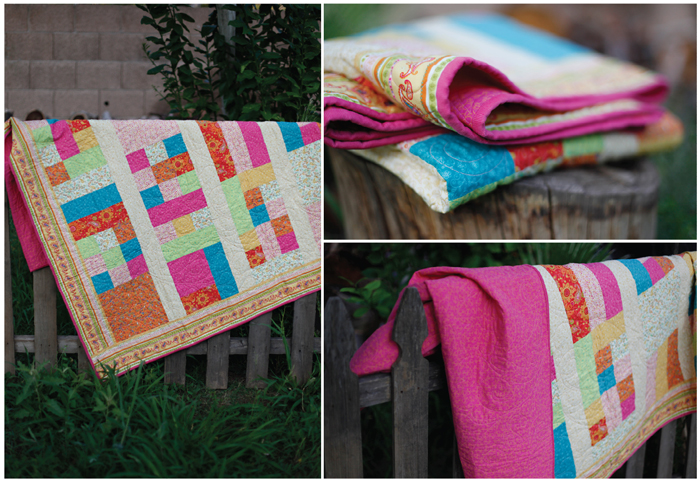
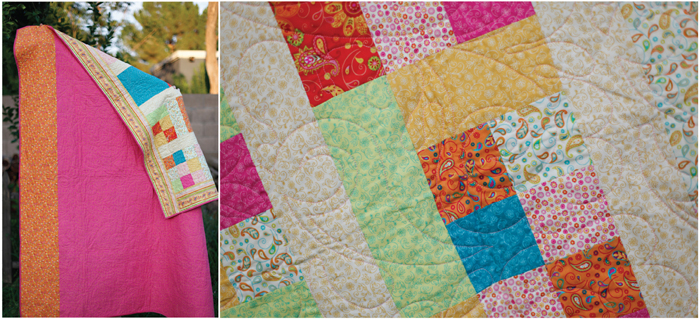
Fruit Market and Swirly Stitching
Monday, August 11th, 2014In August, 2007 I bought my long-arm computerized Statler Stitcher quilting machine and that was the beginning of great relationship between creating and quilting. The more I quilt the more I enjoy quilting on my machine. Every day I learn something new from quilting on my Statler! I have begun to feel proficient using my Statler, and I enjoy quilting almost every day~it’s addicting! There is lots of excitement picking out the pattern for the quilting, choosing the color of the thread, and figuring out how to make the quilt unique.
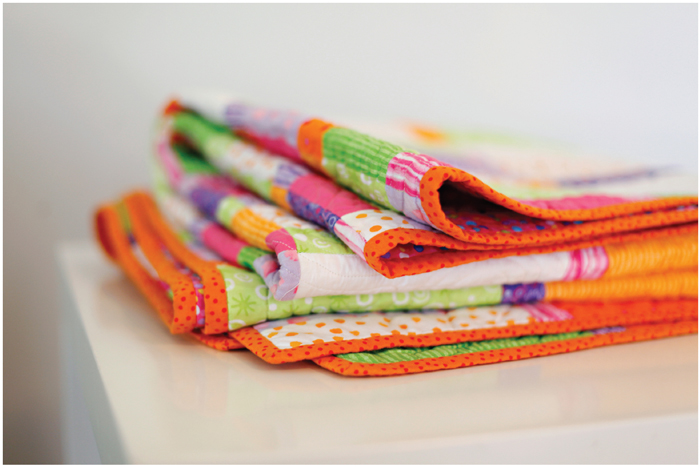
I named the quilt that I’m highlighting today “Fruit Market” after the original pattern I used. “Spice Market,” a pattern designed by Weeks Ringle and Bill Kerr, was featured on the cover of the April, 2007 American Patchwork and Quilting Magazine, and I fell in love with it on sight. At the time, I was using lots of bright colors in my quilting and wanted to make my quilt out of some of my favorite colors. So I did.
The pattern went together fairly quickly. Sewing the individual strips together was fast, cutting them, and then laying them out so that there were no repeats was not quite as fast.
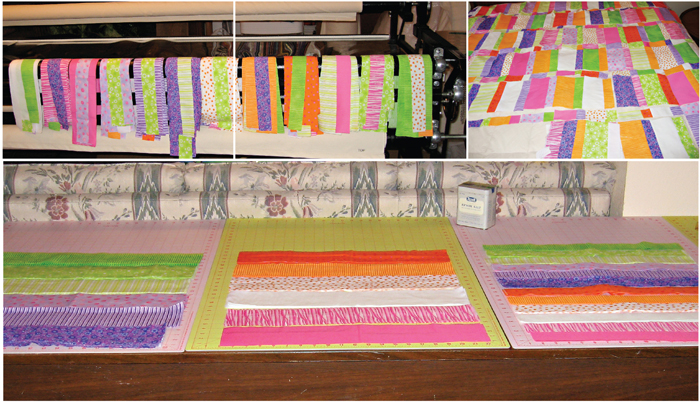 It made my head spin trying to make sure that I hadn’t used the exact same combination before. Although I tried and tried, I still had some places where the same fabrics were together. Even so, I still love it and the bright colors make me so happy!
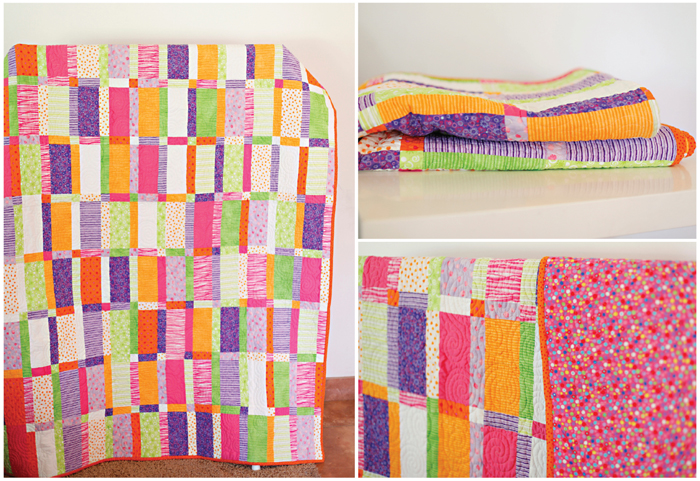
When I did the machine quilting for this quilt, I chose the pattern “Sticky Buns” by Anne Bright, because I wanted the machine quilting to contrast with the straight lines of the quilt. The swirling lines of Sticky Buns created just the right amount of distinction between the quilting stitch and the quilt. The result was just what I was looking for. I find that when I am doing an all over quilt pattern, I am happiest when it varies from the design of the quilt. Straight lines with curvy quilts, and vice versa.
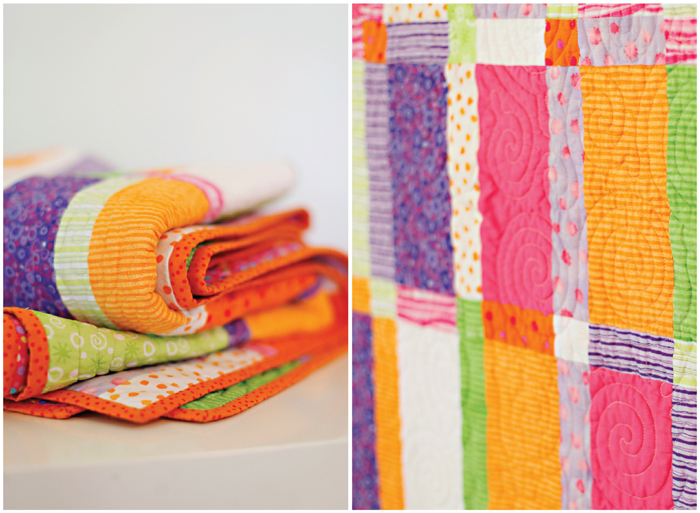
Bright quilts still make me very happy. Even though I make quilts in other color ways, I think my heart will always be with bright colors! Hope you enjoy seeing my first Statler machine stitched quilt! Happy Monday!


