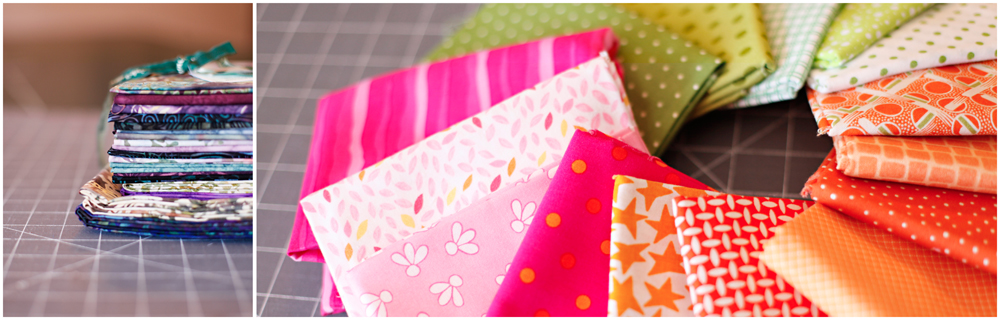
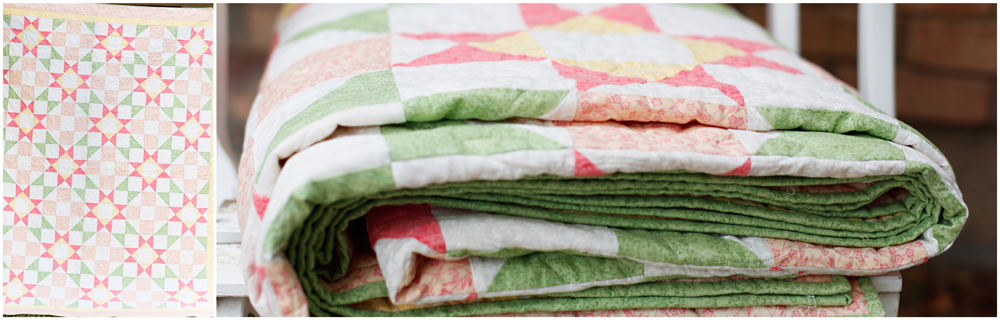
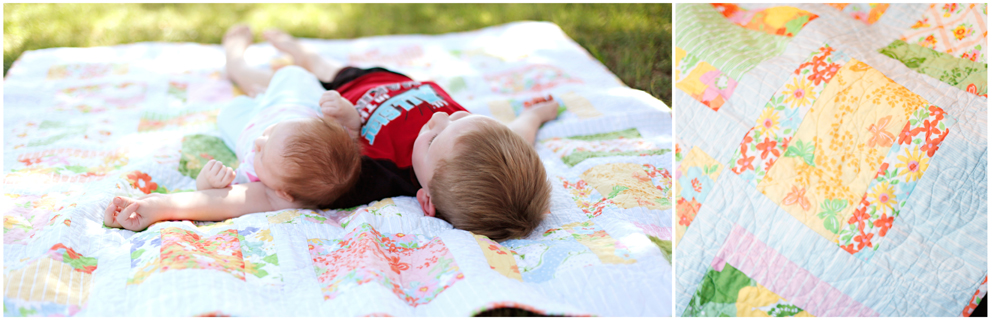
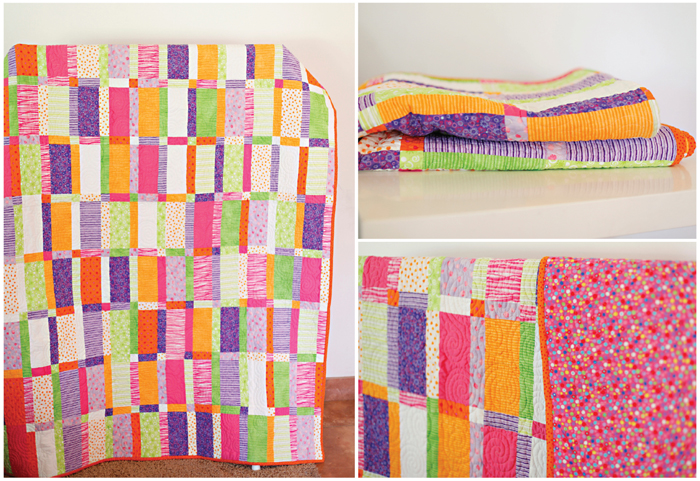
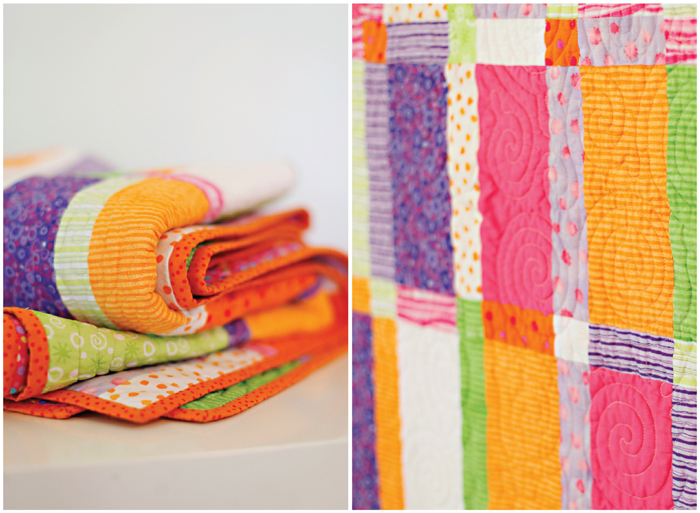
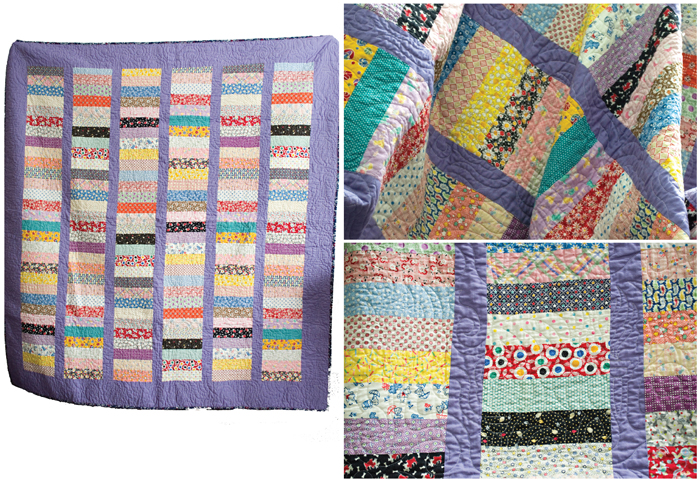
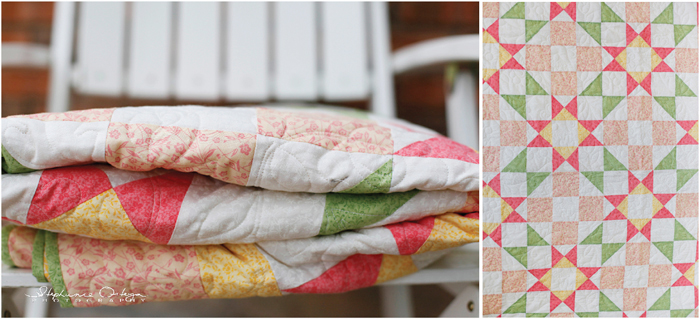
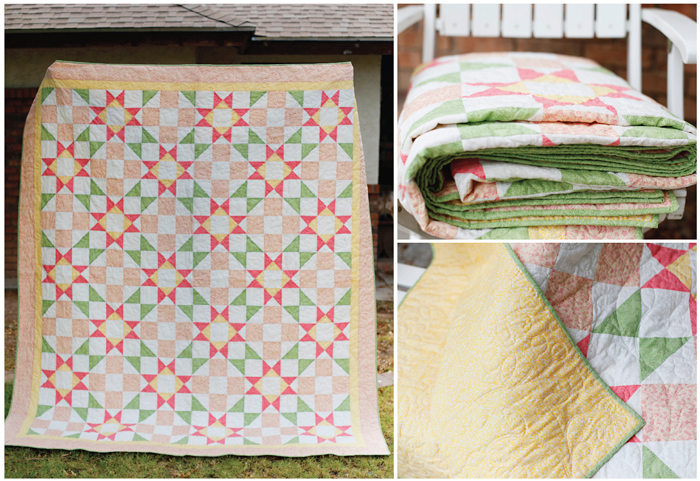
I can’t believe it is already the end of February 2015! Happy Christmas, Merry Thanksgiving, Happy New Year and Happy Birthday to four of the gals here at Triangles Gone Mad! (Jaime, Hilaree, Jessica and Me (Stephanie)… TIME FLIES!!! We have gone a long time with no blogging and I have gone a long time with even no quilting… Instead there were holidays, birthdays, a funeral, buying a new house, moving, and normal every day life happenings. And now here I am getting back on the horse.  I always wanted to make a charm quilt (a charm quilt is a quilt where each fabric is different and never repeated). I liked the idea of using hundreds of different fabrics to create something truly unique and never replicable. Because of the sashing and borders this is not a true charm quilt but it was inspired by them. I named this quilt “Charming Chavo” because it’s colorful and festive.
 This quilt was a long time coming! I spent YEARS collecting the fabric and MONTHS cutting each piece, WEEKS sewing it together and mere DAYS to quilt and bind it. The closer I got to finishing this charm quilt, the faster and more diligently I wanted to work on it. The pieces came from old fabrics my mother used for our clothing as children, fabrics we had quilts made out of and scraps from my own quilting. I was somewhat un-scrutinizing in the way I selected the different fabrics. If it was colorful or interesting, I would cut a piece and add it to the pile. I just wanted enough to make the quilt. 🙂
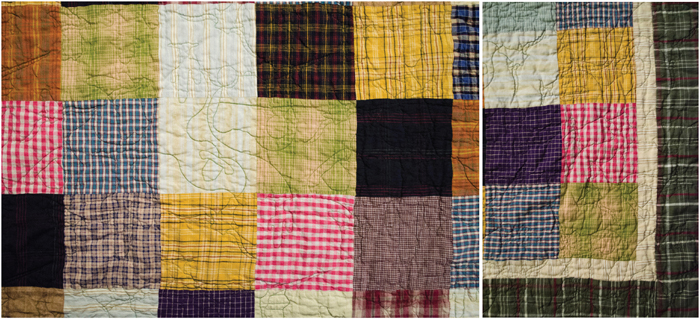
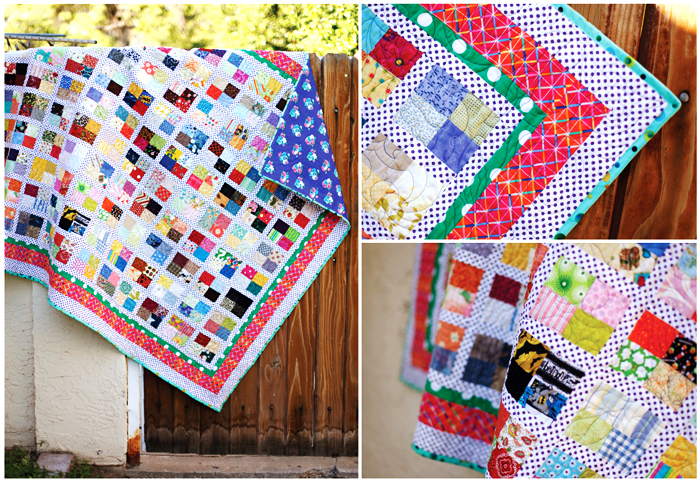 Choosing the sashing was a bit of a conundrum for me. I thought since it was such a big part of the quilt that I had to get it right! I imagined it originally with plain white sashing. However, after laying some of the completed blocks onto the sashing material, I realized that it was boring and too predictable, so I found a fabric that I felt gave the quilt my desired vibe. I was hesitant because sometimes a small print on a large area can get crazy, but I think on this one it was a win!
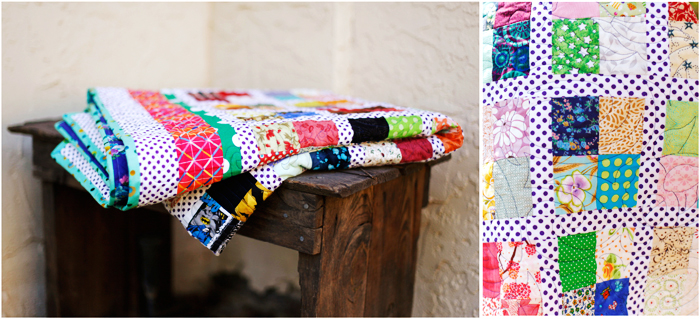 The quilt deets:
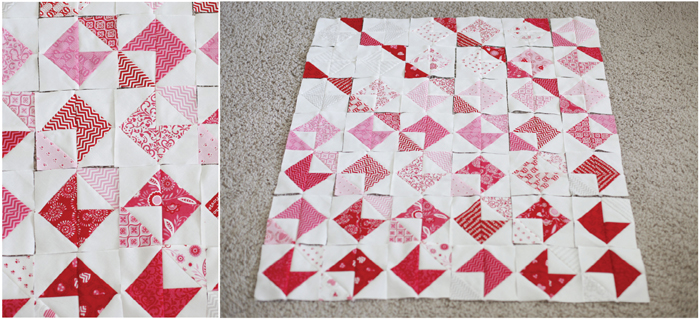
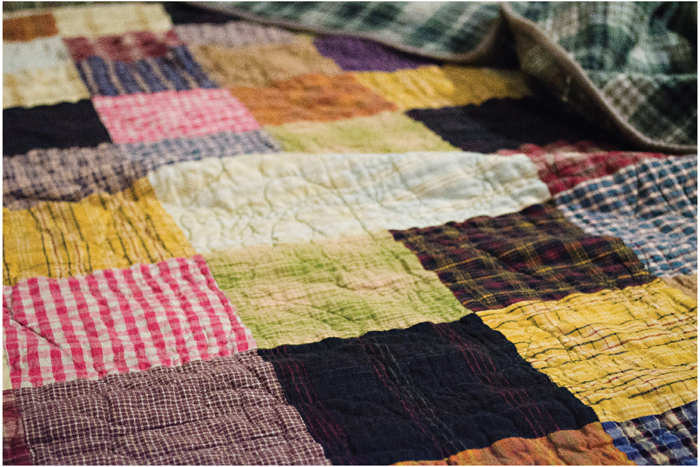
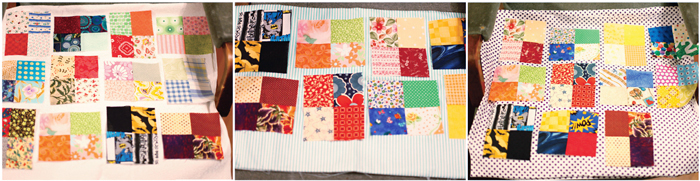
485 different fabrics used in this quilt
120 rectangles (each made of 4 fabrics)
1″ finished sashing between each rectangle
Finished quilt measures 60″ X 78″
One accidental repeat of fabric… oops!
Happy Saturday!

Posts Tagged ‘Quilting’
Charming Chavo
Friday, February 27th, 2015Grandpa’s Quilt of Valor
Tuesday, November 11th, 2014The mission of the Quilt of Valor Foundation is ” to cover service members and veterans touched by war with comforting and healing Quilts of Valor.” To date the QOV Foundation has awarded over 108,000 quilts to veterans of American wars. I have been quilting for QOV for about two years, and it is so very rewarding to do some small thing for our service men and women who give so much for our safety and freedom. To learn more about QOV go to their website here.
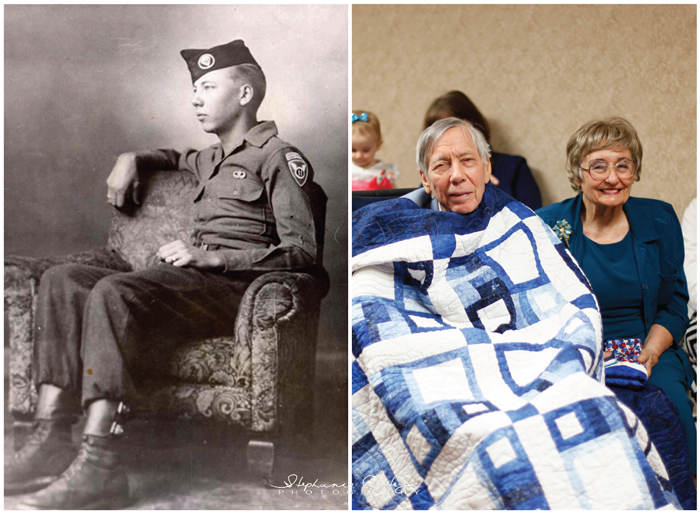
Last month I was privileged to award a Quilt of Valor to my father-in-law, Gene Wade, who served in the Army’s 11th Airborne Division as a paratrooper. He was stationed in Japan at the end of WWII. At the time we gave him the quilt he had just had a stroke, and was in a skilled nursing facility at the time. They were gracious enough to let us use one of the public rooms for the ceremony.
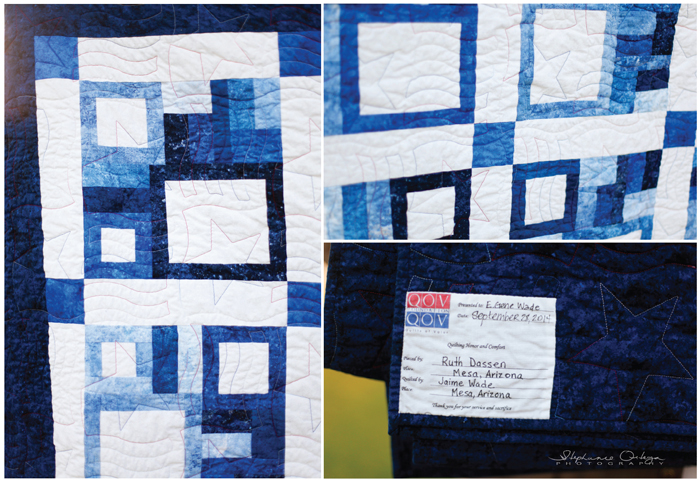
The quilt we gave him was one that I had done the longarm quilting on. The quilt top was made by Ruth Dassen, who is a tireless worker when it comes to making Quilts of Valor here in Arizona. The quilt was beautifully sewn and the quilting added the final touch.
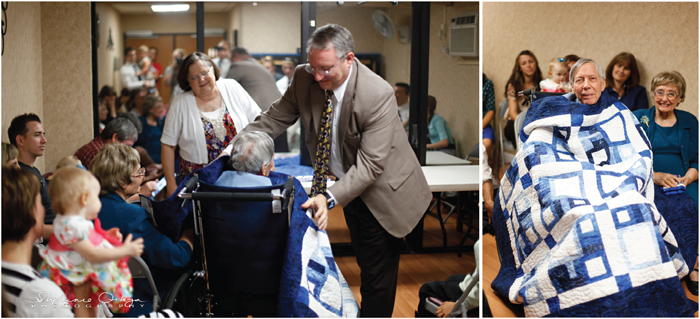
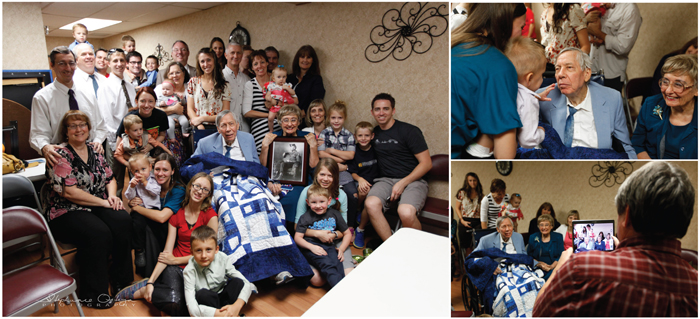
Here is my husband, David, wrapping Gene up in all the warmth and appreciation that is stitched into every Quilt of Valor. Gene and Joy were happy to receive the quilt and appreciation that came along with it. All the family members wanted to share in the excitement of the day, especially the great-grandchildren! Thank you, Gene, for your service to our country!
InStyle Inspiration
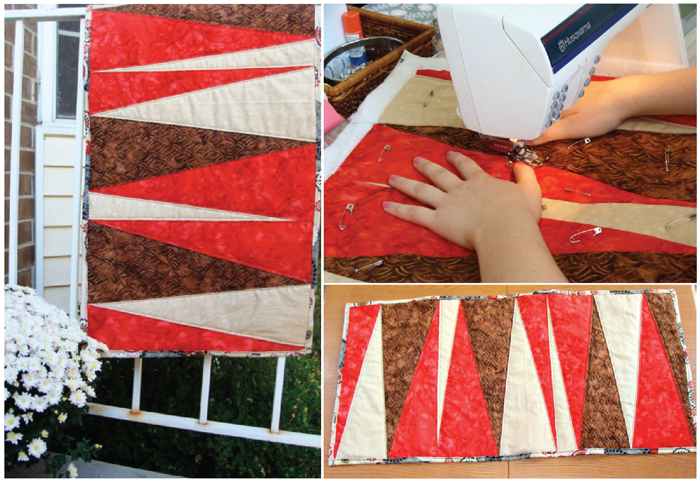
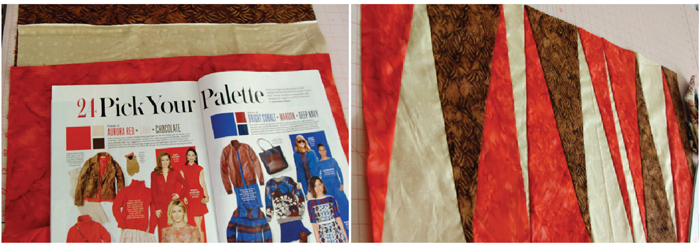
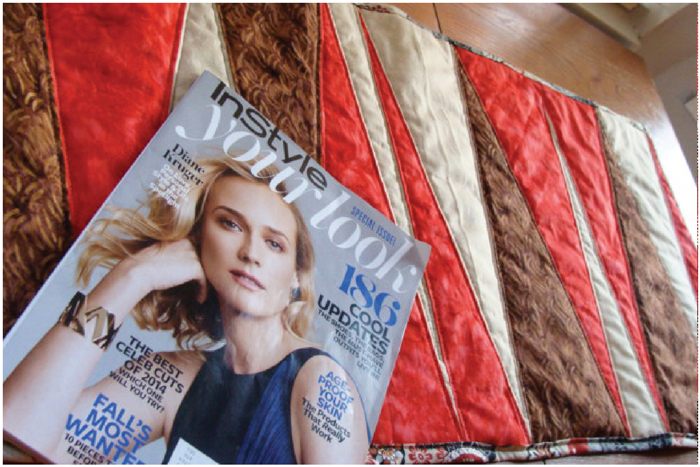
Sunday, September 7th, 2014I’ve been a subscriber to InStyle Magazine since 2011. What started as a well thought Christmas present became a friendship. InStyle and I get along really well. It influences my style and this week it has influenced my quilting. One of the recent issues was the Fall Special Issue “Your Look” and it describes 30 ways to update your look. #24 was “Pick Your Palette” which gave some examples of great color palettes. The palettes are unique combinations of colors and for quilting are a great place to start. I chose one of the palettes and made a table runner to show how easy it is to go from runway to quilt-way! The palette included Aurora Red, Sand, and Chocolate.
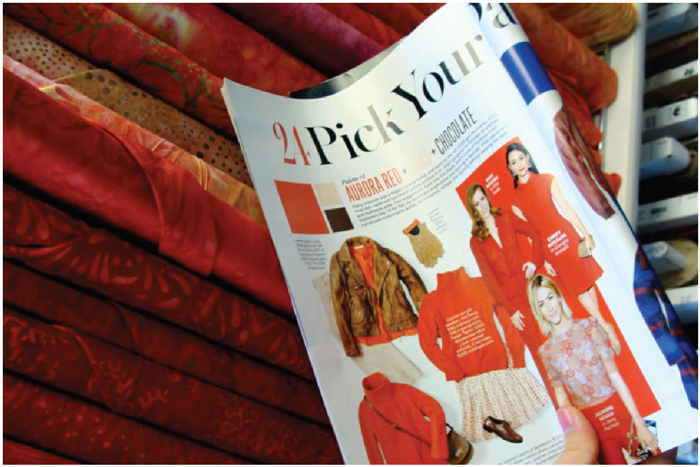
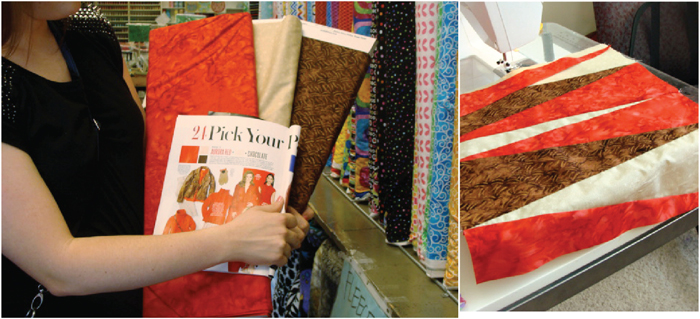
I did an easy modern design to showcase the palette. My mother came up with the design and an easy way to make it. We stacked the 3 different fabrics (each 1/2 yard), one on top of the other, and cut across making different triangles. Then we rearranged the colors, sewed the pieces back together, and ta-da, table runner!!! I really love the way these colors go together and I got the idea from a fashion magazine!
Things to think about when going from runway to quilt-way:
1. Fashion colors might not have enough contrast for your quilting squares. My runner had a bright, a dark, and a neutral color. This is a good way to start.
2. Sometimes fashion can be extreme and over the top, so just use little bits of inspiration. Example: Feathers covering entire outfits= some feather printed fabric.
3. Look for fashion trends that can be translated to home decor because quilts usually add to the home look. An example of this is the mighty chevron stripe! Looks good on a skirt and a bed spread.
Fashion can be a means of inspiration for a quilter. Trends this fall include neutral plaids, winter pastels, animal print (especially snakeskin), and mixing bold and bright colors with subdued tones (easy to translate to quilting). So be bold in your quilting and seek for inspiration outside the quilt shop.

Laying Out Your Quilt
Sunday, August 31st, 2014
What to do, what to do . . . Sometimes figuring how to lay out your quilt blocks once they’re made is the hardest part of making the quilt. I find that after I have spent all the time cutting and sewing the blocks, I’m not sure if I want the quilt to look like the original design I’ve been working on for the last several days! That’s what design walls are for, you say? Well, I have a design floor. Somehow I’ve never gotten a design wall up anywhere, mostly because I have things hanging on every available wall in my house . Here are four different ways of laying out this quilt. Post your comments on which layout you like, and later I’ll let you know which one I chose.
A.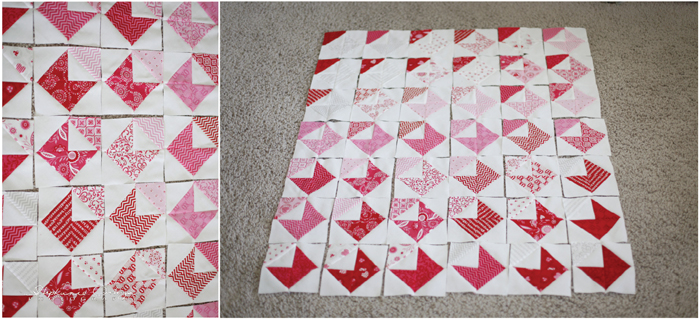
This is the original layout for my quilt. I saw The Love Note Quilt first on the Missouri Star Quilt Company’s YouTube channel, and I fell in love with it. So did my daughter, Stephanie! So now it’s going to be her daughter, Hope’s, baby quilt. As you can see, I laid the quilt pattern out in a gradient from light grey to dark red. I’ve spent a little time getting it all put together. I really enjoyed making the quilt squares, and now it’s time to sew the rows together, but do I really want it to look this way?
B.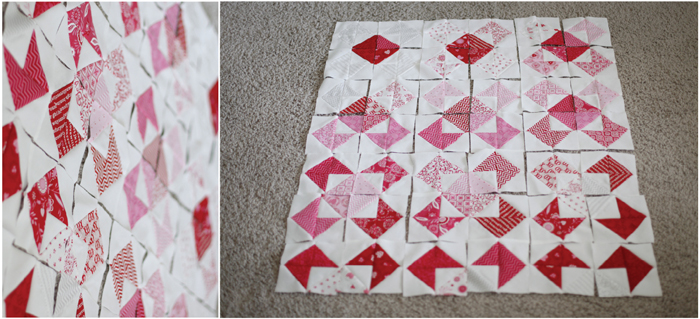
The patterns above and below are variations of the second pattern I tried. In the layout above (B.) I kept the squares in the same order, simply turning them to create the X patterns. By simply turning the blocks, I kept my original idea of a gradient from light grey to dark red. However, I don’t think it’s as apparent in this layout as it is in the first layout.
C.
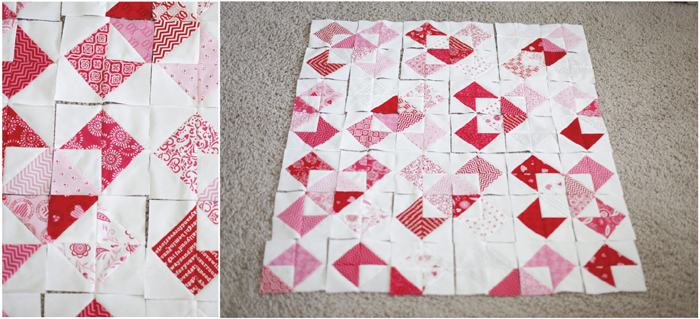
In this layout (C.), I placed the blocks randomly but in the same layout as (B.), giving the quilt a more scrappy look. With the more scrappy placement of the blocks, some of the X pattern seems to disappear depending on which colors happen to be next to one another.
D.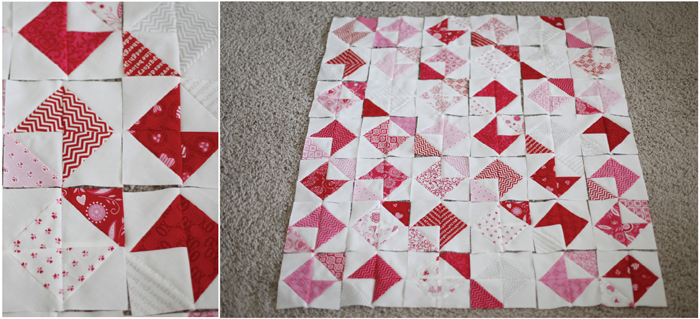
Here’s a look at the last layout I did for this quilt. The layout above was done with the blocks still scrappy (D). It’s funny, but it wasn’t until after these were all laid out that I realized that they were in rows with each envelope block turned the opposite way. You can see it if you look hard, but the actual appearance seems to be diagonal rows of envelope blocks. I really like this one. I like the way the alternating blocks create a white envelope made from the four blocks coming together. One of the fun things about changing the layout is the secondary designs that appears when you put the blocks together.
This last layout (E.) is the same as the one above (D.) with the blocks back in a gradient from light gray to dark red~I like this one, too! There are so many ways to lay out the blocks you’ve made for your quilt. Just have fun designing your quilt. Nothing is written in stone, so make it the way you want it to look. Which one do you like the best?

Fruit Market and Swirly Stitching
Monday, August 11th, 2014In August, 2007 I bought my long-arm computerized Statler Stitcher quilting machine and that was the beginning of great relationship between creating and quilting. The more I quilt the more I enjoy quilting on my machine. Every day I learn something new from quilting on my Statler! I have begun to feel proficient using my Statler, and I enjoy quilting almost every day~it’s addicting! There is lots of excitement picking out the pattern for the quilting, choosing the color of the thread, and figuring out how to make the quilt unique.
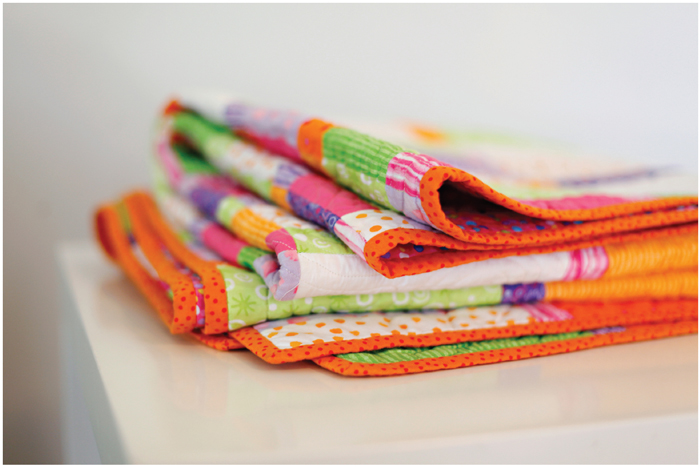
I named the quilt that I’m highlighting today “Fruit Market” after the original pattern I used. “Spice Market,” a pattern designed by Weeks Ringle and Bill Kerr, was featured on the cover of the April, 2007 American Patchwork and Quilting Magazine, and I fell in love with it on sight. At the time, I was using lots of bright colors in my quilting and wanted to make my quilt out of some of my favorite colors. So I did.
The pattern went together fairly quickly. Sewing the individual strips together was fast, cutting them, and then laying them out so that there were no repeats was not quite as fast.
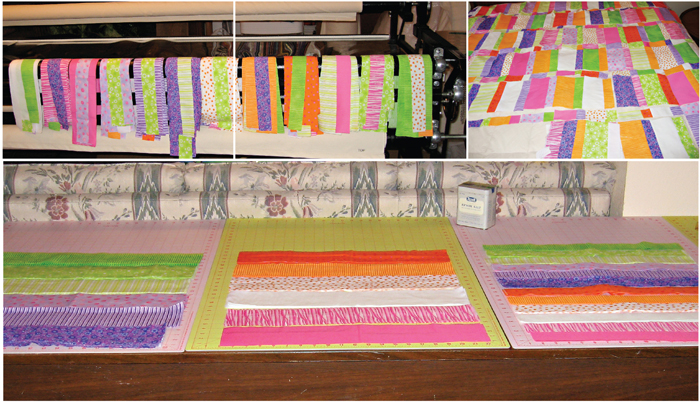 It made my head spin trying to make sure that I hadn’t used the exact same combination before. Although I tried and tried, I still had some places where the same fabrics were together. Even so, I still love it and the bright colors make me so happy!
When I did the machine quilting for this quilt, I chose the pattern “Sticky Buns” by Anne Bright, because I wanted the machine quilting to contrast with the straight lines of the quilt. The swirling lines of Sticky Buns created just the right amount of distinction between the quilting stitch and the quilt. The result was just what I was looking for. I find that when I am doing an all over quilt pattern, I am happiest when it varies from the design of the quilt. Straight lines with curvy quilts, and vice versa.
Bright quilts still make me very happy. Even though I make quilts in other color ways, I think my heart will always be with bright colors! Hope you enjoy seeing my first Statler machine stitched quilt! Happy Monday!
July Journey-ing
Sunday, August 3rd, 2014This past month has been jam packed with family, fun, and travel. June 20th we took off for Oklahoma where our son and his wife live with our beautiful granddaughter, Kayli. We had fun times with them at the zoo, and then took off for parts unknown (to us).

Arrived in North Carolina two days later to help our son Darryl and family move around the corner to a new house. Even moving just a few hundred feet takes SO MUCH WORK! We had fun helping them move and now I can picture where they are living! Great times in North Carolina, visiting Duke campus, and generally hanging out with our four grandchildren in NC. Then on to Virginia to help our daughter and her family move! It’s been a moving summer! Jessica and family have been in Fairfax for 9 years, and have moved south near Charlottesville where her husband will be working at the University of Virginia. We had so much fun with our six grandchildren in Virginia, and loved seeing their new home. So exciting for them to move from their townhouse bursting at the seams to a beautiful, large home on half an acre. 
When we got back to Midway, Marg, Hilaree and I got to work on getting my studio into tip top shape, and I’ve been sewing and quilting ever since. Alex, Jeff’s daughter, saw the fish with lips fabric and had to have some pj’s using the fish fabric! The last four days in Midway I have managed to get five quilts long-arm quilted as well as sewing on three other quilts. It’s been lots of fun, and great to get back to quilting, sewing and long-arm quilting! 
More moving this weekend, as we helped our son, Jeff, and family move to Midway for the interim between college and job. And back to Mesa on Monday for us!
Happy Saturday!
Quilting Romance
Wednesday, July 30th, 2014It all started when I saw a “Boyfriend” quilt at the American Quilting store in Utah. It was love at first sight! This quilt was just a basic square block quilt. I was excited and decided to make it. I have always loved plaids and gingham and so I decided to give it a western theme. I then renamed the quilt my “Cowboy” Quilt, and decided that my future “tall dark and handsome” could maybe be a cowboy. I mean really who doesn’t like tight jeans and boots!!? When designing my quilt I also added more rows as well as added borders. This quilt was the easiest quilt to make. It’s simple and straightforward. The hardest part was laying it out. It is my favorite quilt I’ve made so far.
I often joked that this quilt was for my future husband, which was very forward thinking of me since I didn’t even have a boyfriend at the time. however, whomever he was he was going to become the lucky owner of a very cool quilt. That was back in 2010.
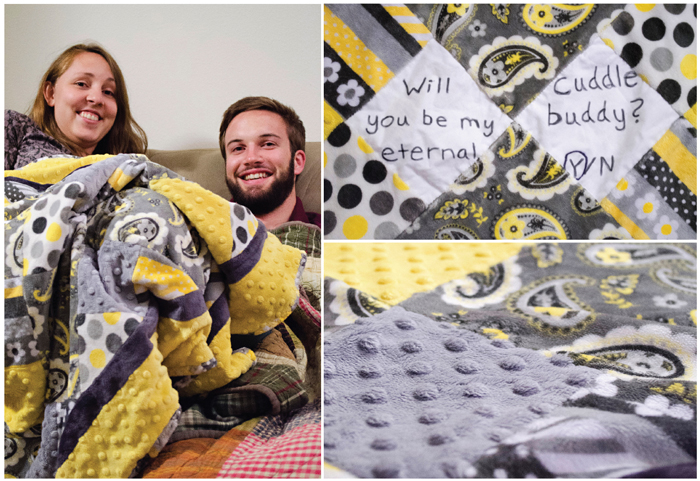
Three years later I met Dan and we started dating. He is tall dark and handsome but no cowboy. When we started to talk marriage I told him my cowboy quilt would be his if we got married. (I think that’s what sealed the deal.) After visiting his family for Christmas we went on a drive together. He drove us to a scenic view, said I had to stand up, and gave me a pillowcase with something inside. Not exactly the ring box I was hoping for! To my surprise inside was a quilt he had made with his mom. A quilt asking me to marry him. The quilt says “Margaret will you be my eternal cuddle buddy? Y/N ~Dan” I circled the “Y”. It was very original and pleasantly unexpected. Dan, with the help of his mom and sister, came up with the idea to do a quilt because knowing how much I like crafts, Dan wanted to do something crafty. It was the first quilt he’d ever sewn. He chose the fabric well, it’s cute and completely made of Minky, the soft, plushy material perfect for snuggling with. (So of course I said yes.)
Now we are living happily ever after in our apartment and finishing our undergraduate degrees together. And we often use these quilts for cuddling and watching movies together. It’s great because we’ll have these quilts, and eachother other, forever. Happy Wednesday!

Eeny Meeny Miny Moe…
Saturday, July 26th, 2014Which one to use I just don’t know. Eeny meeny miny moe.
Choosing fabric can sometimes feel like a difficult task. You are about to spend tons of time on creating this work of art and once you start cutting out and sewing together you are pretty stuck with your choices. There are things to do that can make the process easier.
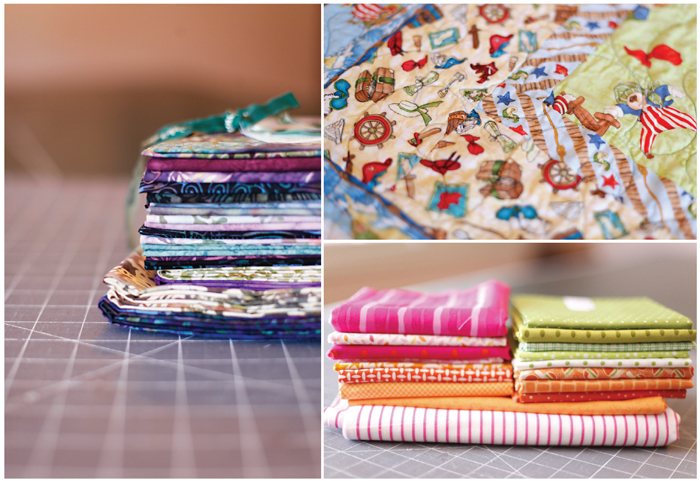
When I am choosing fabric for a new quilt I try to think about a few things including; the quilt pattern ~ meaning the size and shape of the pieces and the way they will fit together, the fabric print & aspect ratio ~ so if it is a huge print or a polka dot that is spaced very far apart (in my opinion that print is wasted on a quilt with very small pieces). I think about color ~ I sometimes want a range of colors and sometimes I want the colors all in the same family, Lights and darks ~ some patterns are highlighted better by the use of lights and darks and some are beautiful when more monotone in hue. The majority of these choices are determined by the feeling and purpose I want my quilt to have. Do I want it to be; Sweet? Edgy? Peaceful? Bold? Fun? Scrappy? For picnics? For reading? To cuddle? For holiday fun?
There’s a lot to think about when planning a quilt. One of the easiest ways to decide is just find a line of fabric that you love. The designers usually include big and small prints, lights and darks, patterns and solids in each line. Sometimes a fabric line that I love has inspired a quilt. Another helpful tool in choosing fabric are great programs that give you the chance to put colors and fabrics together and into the actual quilt pattern. These give you a better idea of what your quilt will look like. However always remember that, whether coloring it on paper or designing it on the computer, The real quilt will look different and more raw than a rendering.
I am currently in the process of making a quilt. Surprise!
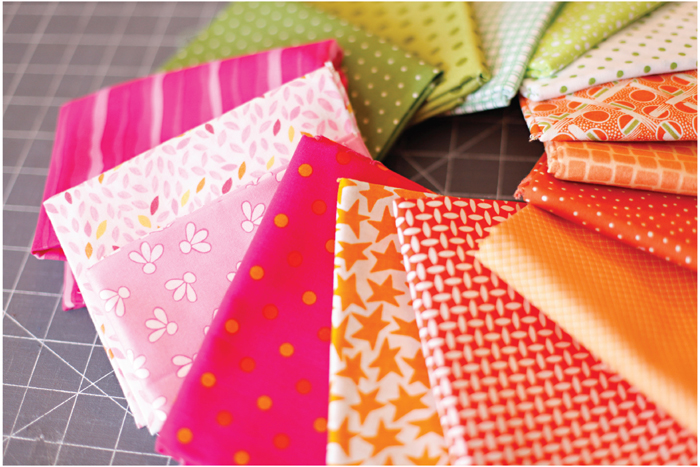
So, I’m really excited to start this project. The quilt I am working on is a charm quilt (which means that every piece of fabric is different). There are 480 different pieces of fabric that I have accumulated over the years. I planned the quilt and then changed the plan. Once the plan changed I decided to add sashing (that’s when there are lines of fabric separating the blocks). For a while I was thinking white sashing to make the colors stand out more… or at least that was the idea. I got this awesome white on white fabric and when I put it next to the squares it looked SO BORING! So, what was I to do?
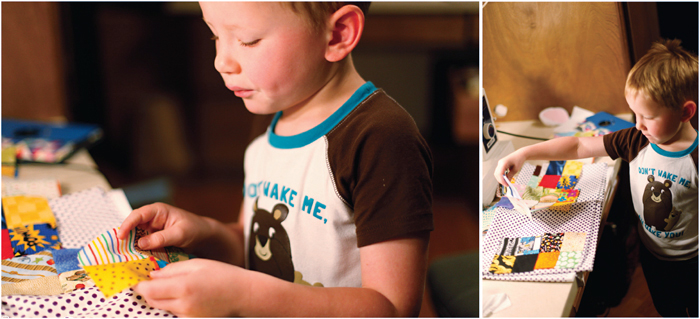
My life since having children has been crazy and much more full of color. The color and life are bleeding into my style. I am in love with pattern and color. I began going through my fabric stash to find a sashing idea. I found two fabrics that I thought would be fun… a polka dot and a striped fabric. Harley was helping me decide. He was laying out his favorite squares and the backing he chose was the polka dots… My preference also. I took photos and texted them to my sisters for more opinions. I laughed when all four of us liked the same one. Polka dots! Great minds think alike… sometimes.
I love polka dots. I am excited for the outcome of this quilt. Let me know… What are the things you think about when choosing your fabric?
5 steps to get excited to quilt! How I did it!
Wednesday, July 23rd, 2014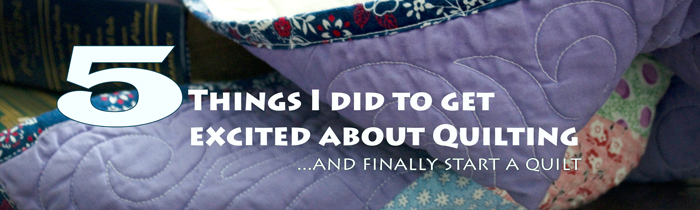 Compared to my sisters I was late to the quilting game. All my sisters had already made quilts of their own before I even considered the idea. I had the desire to quilt after seeing their end results, but lacked motivation. I didn’t quite know where to get started or how to get excited. I decided what the heck, let’s quilt, and found a sure way to become a quilting lover! There are a few steps that got me through my first quilt and I think they apply to every quilt!
1. Love your fabric. If you don’t like the fabric, you won’t like the quilt in the end. I chose 30’s inspired fabric that fit my personality.
2. Go for simple. I used a simple strip quilt design and picked my fabric that was already matched and cut into strips (I used a jelly-roll). First quilt, Sew,cut,piece it together, sew the sashing and borders, but for sure make it simple!
3. Have help! There are so many resources for quilting; quilting blogs, stores, classes, the internet! I had my mother and sisters, I got lucky. 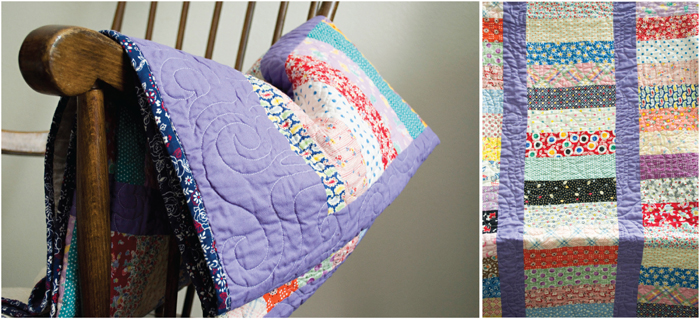
4. Enjoy the work (probably the most important step). Focus on what you enjoy. I love to design quilts and then piece it together. I don’t enjoy cutting fabric, so I got pre-cut strips of fabric that skipped that step. Also, I liked to listen to music as I sewed. I recommend John Taylor and Neil Diamond!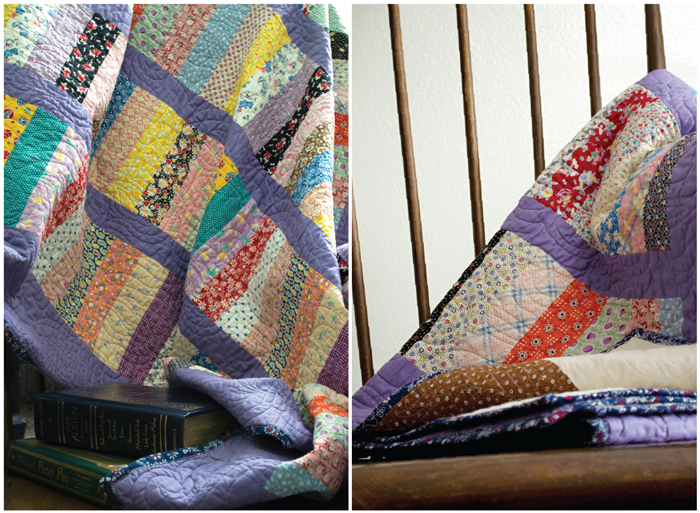
5. Professional finish. It’s worth it to hire someone to professionally quilt your finished top. Looks clean and polished. Again I was lucky, I had my mother and her long arm quilter, this massive machine in her garage that makes quilts look put together!
 I am so proud of my first quilt. I loved making it! Follow these steps and you’ll love quilting too!
Happy Tuesday!
My First REAL Quilt (well… the first one I started)
Tuesday, July 15th, 2014This is the first quilt I ever started. Throughout my youth, I had seen my mother make all kinds of pretty quilts and decided around 16 that I wanted to make one also. My mom helped me design the quilt in a new computer program she had. Once designed I did some math and we went to the store and purchased material. After we got home, I was all “Gung-ho” about making it, for about a week. I started cutting out the fabric but there were SO many pieces. Did I take on too much? This really was a time commitment… then my drive fizzled.
At that time I think I thought this might be the only quilt I ever make so I had better make it good. In hind sight I probably should have chosen an easier pattern with less peices. Five years after starting my first quilt and after starting and completing two other quilts I finally got back on the boat and finished this quilt. I was so proud when it was finally done! It’s very imperfect… just look at those points… but I like it anyway.
This quilt was finished eight years ago. Its a fun quilt and I will always love it because I designed it and it was my “first”. Now the quilt belongs to this sweet little girl. I hope she likes it. 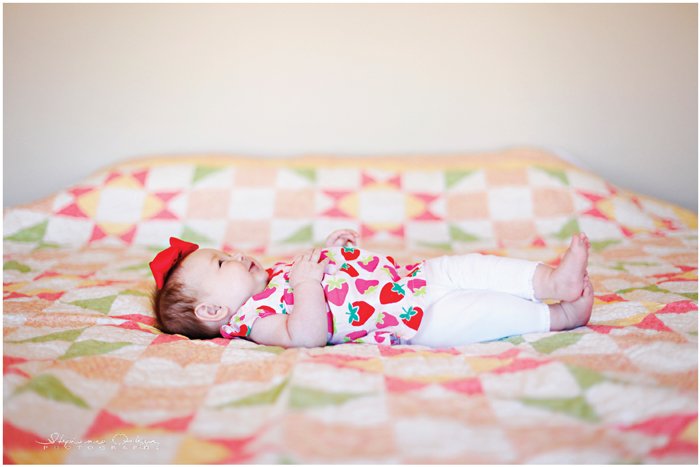
Happy Tuesday!


